

Behind Hercules
The making of the official Nikon D850 time-lapse ‘Hercules Rising’.
Introduction
Late 2016 I got a phone call from Japan asking whether I would be interested in shooting a night time-lapse video for the global introduction campaign of the new Nikon D850. It’s not every day that projects like this come along, so to say that I was excited would be an understatement. This article is about the making of the time-lapse video Hercules Rising and about my experiences with the D850 in the field.
Hercules Rising (click on the icon in the lower right corner to watch full screen).
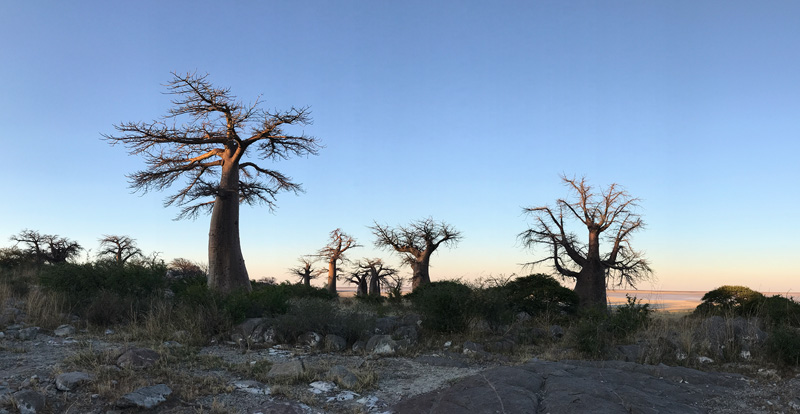
The locations
As my wife Daniella and I plan our photo tours two years ahead, it was a challenge to wiggle it into our schedule. By picking locations that were very close to where we would be, we minimised travel time and made it work. After giving it some thought, I decided to pick three different types of trees as the main subjects: camel thorn trees, quiver trees, and baobabs. Every year in May/June we are in Namibia for our Namibia Untamed photo tour, and that’s where two of our three shooting locations were – the camel thorn trees and the quiver trees. For the baobabs, we picked a remote location in the Botswana desert. If you’re not familiar with these countries, here’s where they are on the African continent:
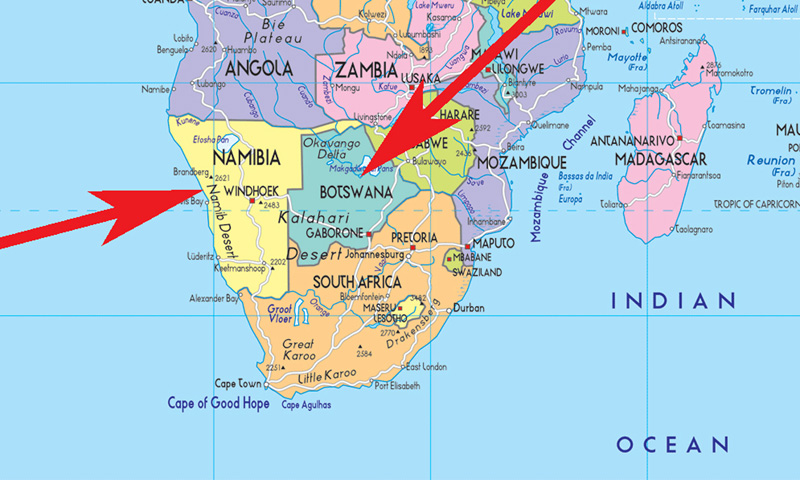
Namibia and Botswana are located in Southern Africa.
The Gear
Over a period of several months, I had weekly Skype calls with Tokyo to discuss the new features of the D850 and how I would be able to use them. We had a limited amount of time for the entire project, so I asked for five D850 bodies: two to put on motion sliders, two for tripods, and one for shooting behind the scenes video. At the time there were only eight prototypes in the world, yet Nikon decided to give me four of them. They also sent me a 24/1.4, a 20/1.8, a 24/1.4, an extra 24-70/2.8 and two extra 14-24/2.8 lenses. Add to that vertical grips for all D850 bodies, my own D5, D500, 80-400 and 200-400, and you end up with a nice cabin luggage challenge.
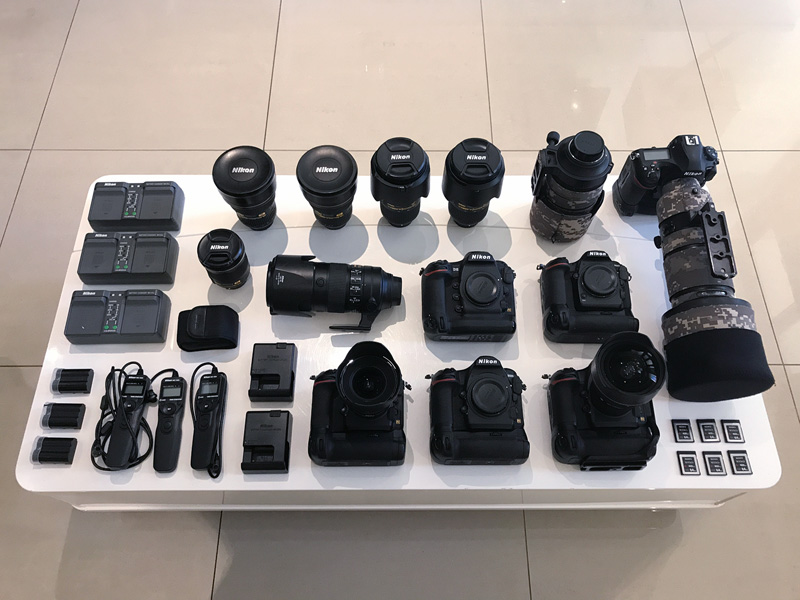
Chargers, batteries, D850 (4x), D5, D500, battery grips, 14-24 (3x), 24-70 (2x), 70-200, 80-400, 200-400, 20/1.8, 24/1.4, cards, and the remote cords I didn’t use.
To make matters worse, we also had to bring the motion time-lapse sliders with us. With the carts, the motors, cables and spare parts that resulted in another nice collection of ballast.
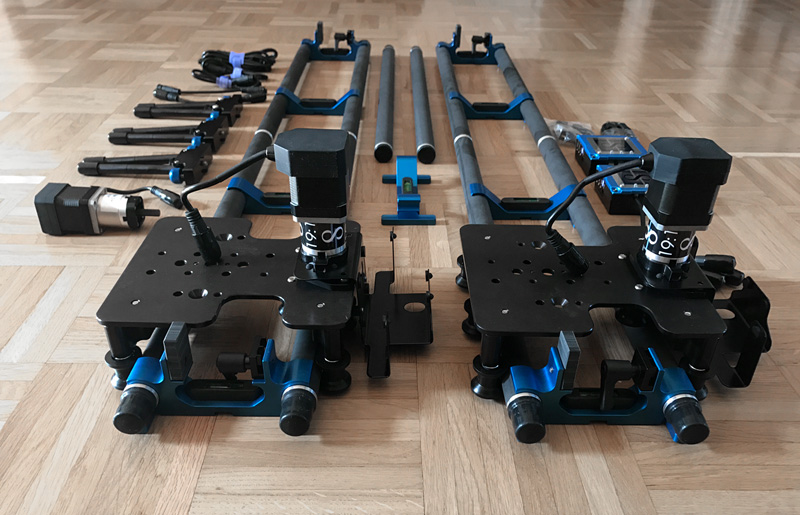
I used two Stage One sliders by Dynamic Perception as I had used a Stage Zero for a previous time-lapse, Namibian Nights, and I liked how well built and reliable their products were. For even more motion, I also added the Sapphire Pro pan/tilt head. The sliders can be disassembled so they can fit in a regular check-in bag, but I preferred to keep the system fully assembled to save time. Consequently, I got two large pelicases which held the intact slider systems as well as the SapphirePro, spare motors/parts, five tripods and other small items.
The luggage challenge
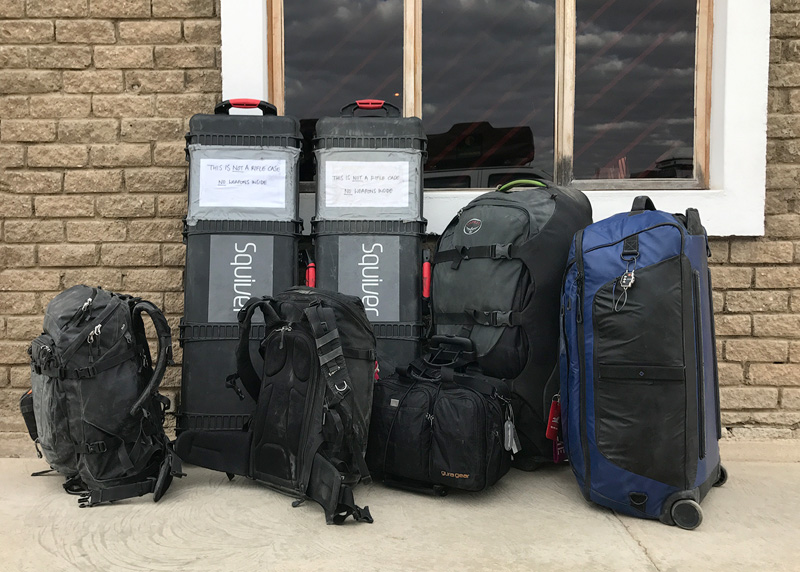
As shown in the image above, we travelled with: two f/stop Tilopa backpacks, one GuraGear Chobe laptop bag (with batteries, cables, chargers, flashlights and ball heads), two large pelicases, and two regular rolling duffel bags. I was pretty happy with how I solved the luggage puzzle, but I made one crucial mistake. In Europe, the large pelicases are mostly used to transport keyboards or guitars. What I didn’t realise was that in South Africa, those cases are primarily used to transport rifles. So when we arrived at Johannesburg airport for the start of our project, we waited at the odd size luggage department, but no cases. We waited some more, but still no cases. Turned out that the cases had gone straight to the police, because they suspected there were rifles in the cases without a proper permit. At the police station I had to show the contents of the cases and then we could take them with us. After that experience, I put a note on both cases. That helped, but it did make the customs officers very curious as to what was in the cases if not rifles.

This is not a rifle case. No weapons inside.
What was in the bag?
Most of the time it contained three D850 bodies, two with a 14-24/2.8 lens on it, and one with the 24/1.4. Two other lenses in the bag were the 24-70/2.8 and a 24/1.4. Additional items were a LaCie Rugged external backup drive, spare batteries, cards, flashlights and other lights, lens wipes, and some small tools. The fourth body with a 14-24/2.8, 24-70/2.8 and 70-200/2.8 I had given to our cameraman Awi.
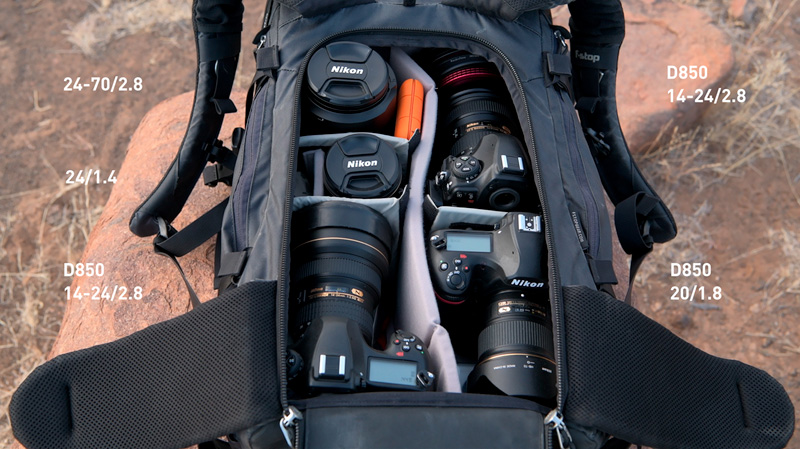
This is what the inside of my camera bag looked like most of the time.
The f/stop Tilopa may not be the roomiest bag available, but it’s extremely comfortable to wear, the insert system is very flexible, and the back access is great. With all the camera gear loaded, it was pretty heavy to hike around with, but the harness is so well made that it didn’t really bother me.
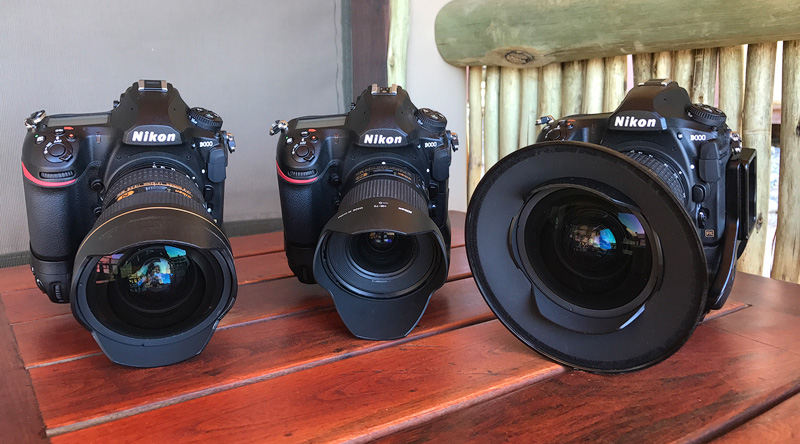
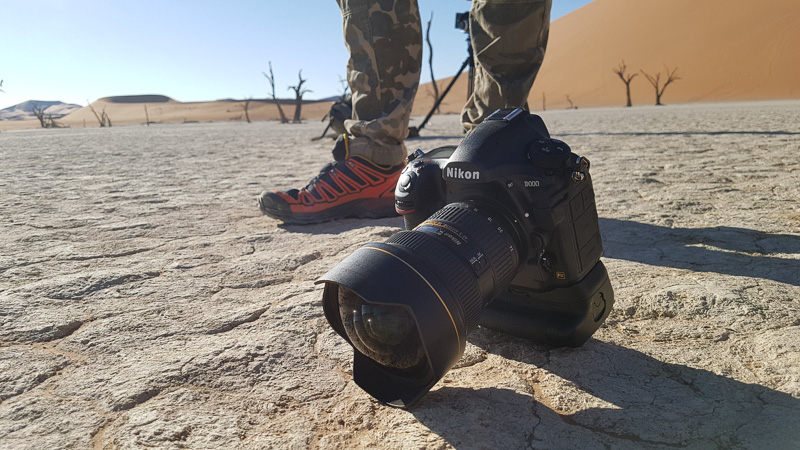
Three of the four prototypes that I used.
Here are the three D850 bodies with lenses attached. The 14-24 on the right is fitted with a Wonderpana filter holder. However, I did not use any filters on the lens – I used the filter holder as an extended sun shade to prevent lens flare from the moon. Note that all three cameras are branded D000, true prototypes.
![]()
Resolution explained. 8K is not twice as large as 4K.
8K: What’s the point?
The main purpose of this project was to shoot 4K and 8K night time-lapse video. Over the past few months, I have heard many people saying: ‘What’s the point of 8K time-lapse?’ At first, their question seems to make sense – after all, there are very few 8K monitors available, and most computers will struggle big time with 8K. But don’t forget that people said the same thing when 4K came out, and look where we are now. It may take some time, but 8K will be the future.
For me, the most important benefit of shooting a time-lapse in 8K is a creative one. Most people think that 8K is twice as large as 4K, but they’re wrong. Have a look at the image above to see how much larger 8K actually is – it’s massive. The real creative benefit of shooting 8K is when you’re planning to do a 4K video. Loading the 8K footage will enable you to create digital zooms, pans and tilts without any loss of quality. In the 4K version of the Hercules Rising time-lapse, I added some digital tilt to the scenes that were shot with the D850 on a slider moving down. It’s subtle, so most people won’t notice it’s a combination of two downward movements, but the effect is quite remarkable.
The ability to add a lot of zoom to your 4K time-lapse should also not be underestimated. Night photographers often shoot with super wide angle lenses to be able to use long shutter speeds without getting any star trailing. Also, the longer the shutter speed, the lower the ISO can be, which means less noise. Quite often though, you’d wish you could frame your subject a little tighter. Shooting at 8K gives you the option to add a massive amount of digital zoom during the editing stage, without any loss of quality.
And finally, we all know that downscaling will make things look sharper and any apparent noise will be far less visible. Downscaling from 8K to 4K will do just that.
The D850, Nikon’s best camera ever?
About the D850
The D810 was basically an update to the D800, but don’t let that fool you into thinking that the D850 is an update to the D810 – it isn’t. Nikon has made so many significant changes, that the D850 is really a completely different camera. Let me explain why.
The Sensor
Instead of using a Sony sensor, the D850 features Nikon’s first ever back-illuminated BSI CMOS sensor, which delivers superior image quality when compared to traditional CMOS sensors. The increase from 36MP to 45.7MP may not seem much, but it’s still a meaningful increase that will enable you to print larger and crop more.
Like the D810, the D850 has the capability to shoot at ISO 64. Because of this, the D850 is able to capture 2/3 EV more light than competitors that offer a base ISO value of 100, allowing it to reach medium format levels of dynamic range. The difference in dynamic range performance between ISO 64 and ISO 100 is quite big, so if shadow and highlight detail are important, you should choose ISO 64. Sure, you can use a smaller aperture, but on any high resolution sensor anything smaller than f/8 negatively impacts the sharpness (diffraction). At its base ISO, the D850 has better dynamic range than the D810, which is quite an achievement. You will clearly notice the difference when recovering shadows. The D850 can even drop down to ISO 32, which can be useful if you want to slow down your shutter speeds without the need for an ND filter.
ISO
Of all the characteristics of the D850, I was most interested in the (high) ISO performance. When photographing the night sky, especially on moonless nights, you always end up pushing the camera to its ISO limits. To prevent stars from trailing, there is a maximum shutter speed one can use for each focal length. Generally speaking, the shorter the focal length, the longer the shutter speed can be. Longer shutter speeds means lower ISO, and the lower the ISO, the lower the amount of noise.
That’s fairly straightforward, but there is another factor at play: the higher the resolution of the sensor, the faster you start noticing star trailing. In other words, when shooting the night sky with a high resolution sensor, your maximum shutter speed drops. This means having to use a higher ISO (unless you switch to a faster and/or wider lens), which will increase noise levels.
Incredible dynamic range, superb high ISO performance, and a new high resolution screen.
I have used the D810 for night photography and night time-lapse a fair bit, and I have gone as far as ISO 3200. The quality of the high ISO noise of the D850 looks much better, so for Hercules Rising I have also shot at ISO 4000, 5000 and 6400. At ISO 6400 I could see some noise in the very dark areas of the images, but the quality of the noise is such that it’s very easy to get rid of in post production. And if you’re planning to shoot your night time-lapse in 4K, remember that you can downscale from 8K, which will result in a much smoother image at high ISO settings. The upper ISO limit is twice that of the D810: 102,400 (which is pretty useless).
Autofocus and frame rate
I shoot landscapes, but I also shoot wildlife. Most wildlife photographers never considered the D810 to be a good wildlife camera for three reasons: the autofocus and the frame rate were not fast enough, and the buffer was too small. They were right, but I used mine for wildlife anyway because I really liked the high resolution. The D850 will prove to be a game changer not only for landscape photographers, but also for wildlife shooters. Just like the flagship D5 and the popular D500, the D850 has a 153-point AF system featuring 99 cross-type points. The difference is very noticeable.
Thanks to a dedicated AF processor, the D850 can keep AF points on a moving subject even in continuous shooting, rather than subject tracking performance dropping during bursts, as the D810’s did. The center AF point is sensitive down to -4 EV, with all the other points sensitive down to -3 EV. This means you can still autofocus on a moonlit night, and two stops improvement over the D810. The 15 AF points near the center of the sensor are sensitive up to f/8, which means you can use a 2x teleconverter on an f/4 lens and still be able to autofocus.
As for the frame rate, the D850 can shoot up to 9 frames per second (with the optional MB-D18 battery grip). Not a match for the 14 fps of the D5, but a serious improvement over the 5 fps of the D810. From my experience, 9 fps works fine for most wildlife photography.
But 9 fps are not worth much if your buffer fills up after shooting a single burst. The D850 can shoot a whopping amount of 170 RAW images in 12-bit lossless compressed format, and 51 RAW images in 14-bit. The D810 was limited to 47 RAW images in 12-bit, and 28 in 14-bit. A significant improvement.
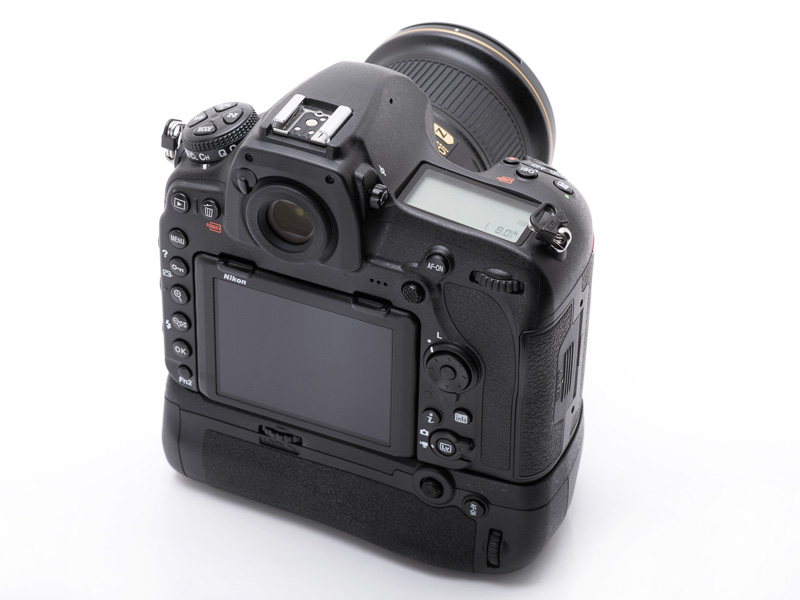
The D850 with the optional MB-d18 grip.
The MB-d18 battery grip
I have added battery grips to all my ‘small’ Nikons: the D810, D500 and D850 (the D5 has a built-in grip). There are four reasons for doing so:
– Easier to handhold vertical shots
– The body is better balanced with a grip, especially when using longer lenses
– Increased frame rate
– Increased battery life
Let me start by saying that the D850’s grip has been improved – it’s deeper and more comfortable, especially when holding the camera with long lens combinations. The MB-d18 is also an improvement over the previous version, and together they work like a charm. The camera obviously gets heavier with the MB-d18, but when coupled with professional quality f/2.8 lenses and telephoto lenses, the balance is so much better. The increased frame rate (9 fps with grip, 7 fps without) is not a benefit when shooting time-lapse, but the increased battery life most certainly is.
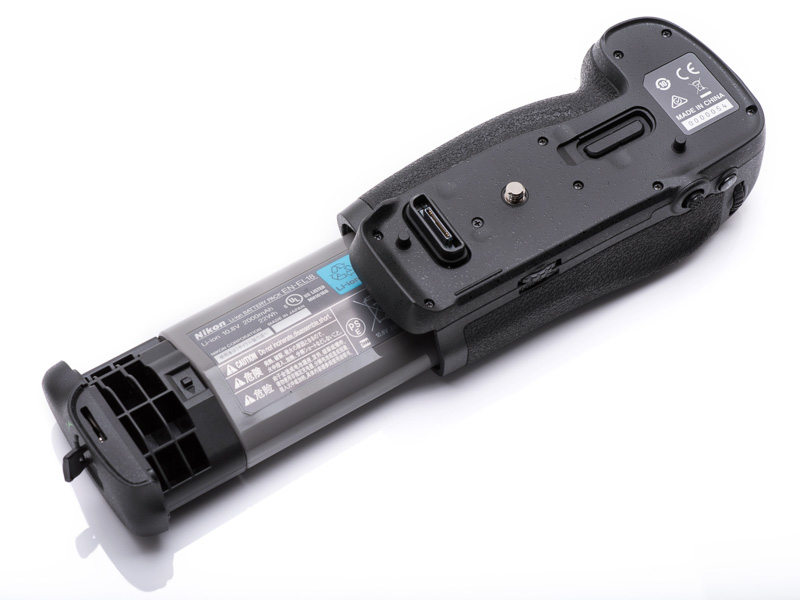
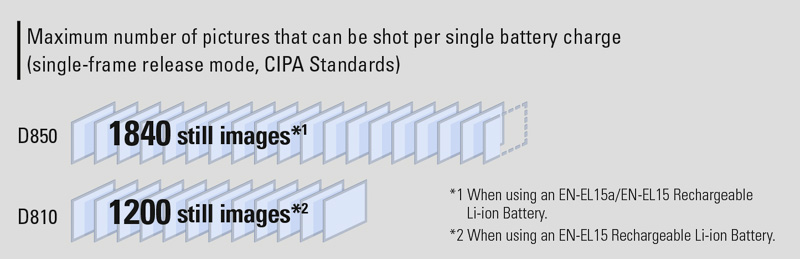
The MB-d18 with the EN-EL18b battery will give you 5,140 shots per charge.
When shooting night time-lapse, your scenes are only going to be as long as your battery will last. The D850 can shoot 1,840 images on a single EN-EL 15a or EN-EL 15 battery, as opposed to 1,200 images with the D810. If you use 30 second exposures, that 640 shots difference will give you over 5 hours of additional shooting time! With 25 fps for time-lapse video, that means an extra 25 seconds of footage. This is without the MB-d18.
Battery life is especially important if you want to shoot day-to-night or night-to-day time-lapse sequences. For Hercules Rising I started several sequences about an hour after sunset to let them run throughout the night. At night the temperature in the desert can drop considerably, which negatively affects battery life. This is another reason I use the MB-d18 as it allows me to use the even more powerful EN-EL 18b battery. With that combination, you can get a staggering 5,140 shots per charge. Needless to say that every time I returned to the location the next morning, the D850 was still firing away.
For those who like to shoot star trails this can be an important reason to get the MB-d18; the longer your batteries last, the longer your star trails will be.

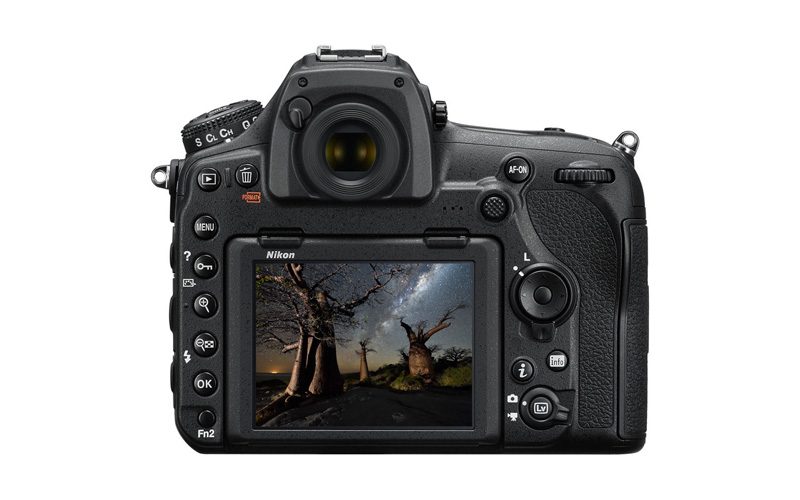
Great ergonomics, and now with the ISO button where it makes most sense.
Design and ergonomics
The ergonomics of Nikon dslr’s is unrivalled. At first glance not much has changed, but when you pick up the D850 you will feel that Nikon has slimmed-down and deepened the grip compared to the D810. They did the same with the D750 and the D500, and it makes the camera very comfortable to hold. Just like the D5, the D850 now has a dedicated ISO button next to the shutter button, a joystick (nicer to use than the eight-way directional pad), and the awesome backlit controls – a joy to use in the dark.
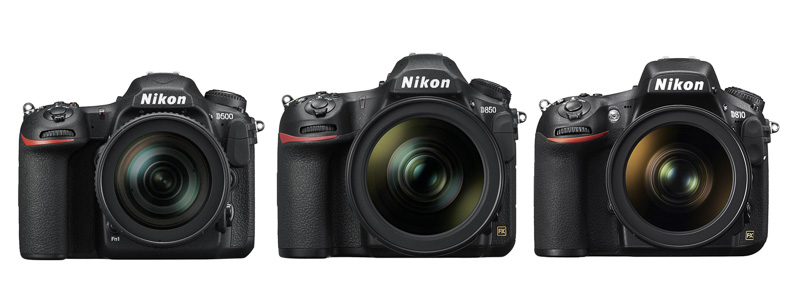
From left to right: The D500, D850 and D810.
Arguably the most drastic decision Nikon has made for this camera, is the removal of the built-in flash. I personally never really used it, so I won’t miss it, but there are two big advantages to this. First, the removal of the built-in flash has created more room for the new viewfinder, which is now the largest one on any Nikon (0.75x). And without the flash, the D850 is much better weather-sealed against dirt, dust and moisture than the D810.
The LCD screen is still the same size, but the resolution has almost doubled at 2.359 million dots. It is now tilting and touch-enabled, bright and very responsive. You can use this touch sensitivity in live view mode and for navigating menus, as well as for in playback mode (unlike the D5 and D500).
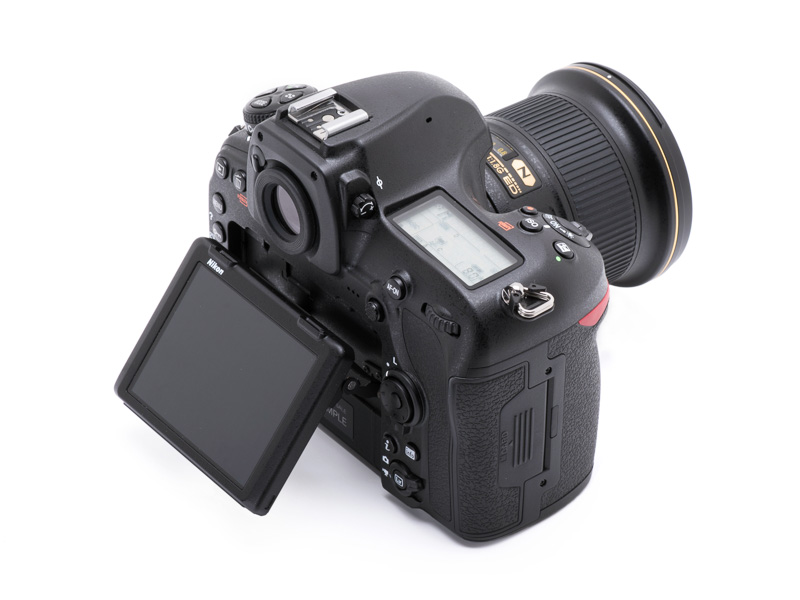
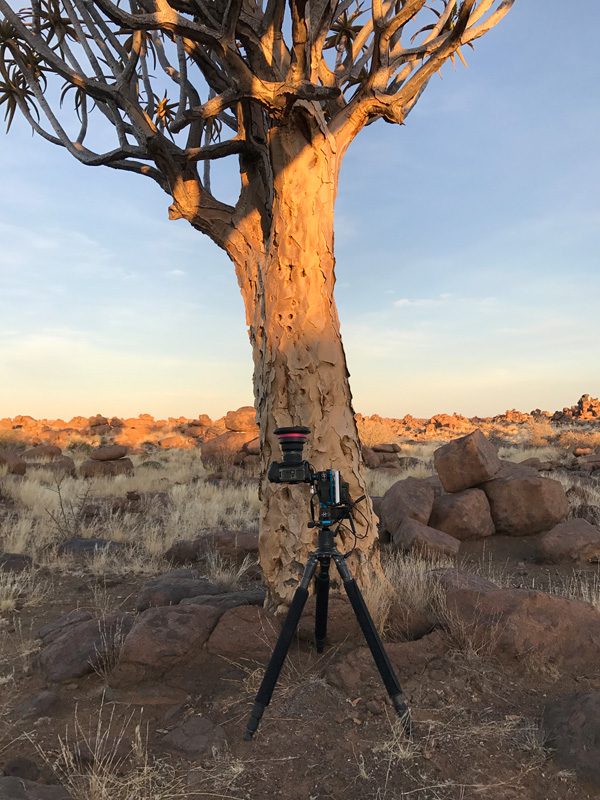
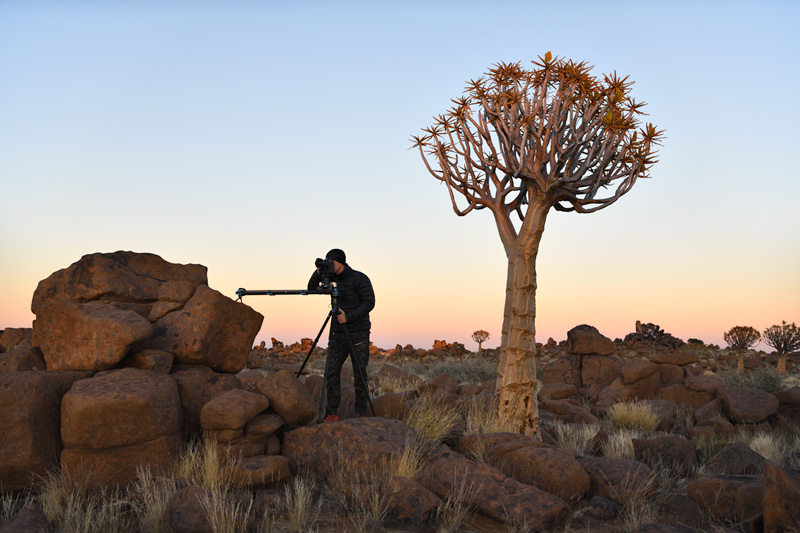
The tilting screen can tilt up to 90º and is very useful when shooting up from low angles.
When you’re photographing the night sky, that means that your camera will be pointing up. Shooting from very low angles always required a right angle finder, and even then you needed to get down as low as the viewfinder to see where you’re pointing at. Having the tilting screen has completely changed the way I’m shooting and it has reduced the amount of trips to the chiropractor. Being able to tilt the screen for still images is already quite a treat, but when I’m running tests from the motion slider or with the camera mounted on the pan/tilt head, it’s absolutely fantastic. Below you can see me run a test for a setup in Deadvlei, Namibia. It would have been nice if the screen could also tilt sideways for vertical still images.
Testing the camera movement for one of the time-lapse setups using the tilting screen.
The D850 has dual card slots, one SD and one XQD. I really don’t understand why there are not two XQD slots (with the D5 you have this option), as XQD cards are so much faster than SD. You don’t realise how fast they are until you start downloading your images from your XQD card onto your computer – it’s really, really fast. I understand that most people still have SD cards, but most people also still had records when the CD was introduced. It’s time to move on.
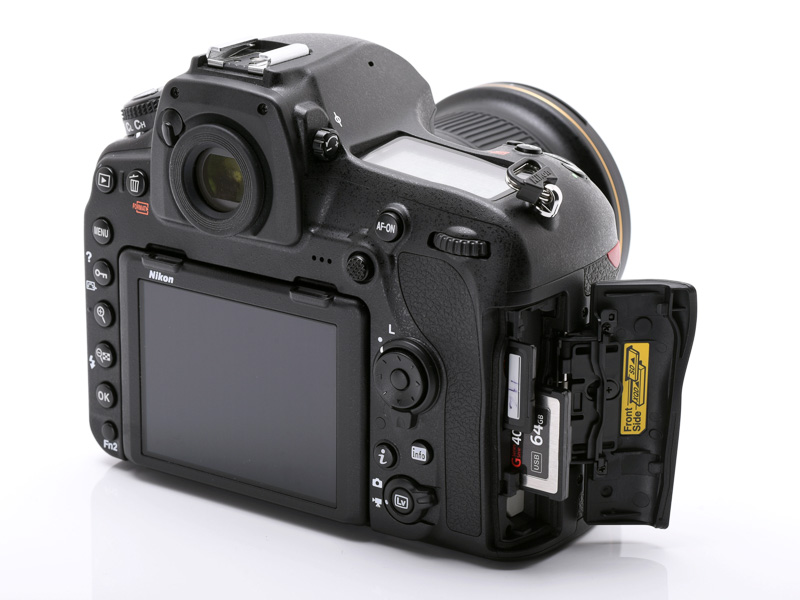
Two card slots – one SD, and one XQD.
Built quality
Shooting night time-lapse video means leaving your camera exposed to the elements for hours on end. For Hercules Rising I shot most of the images in extremely dusty conditions with the D850 often very close to the ground.
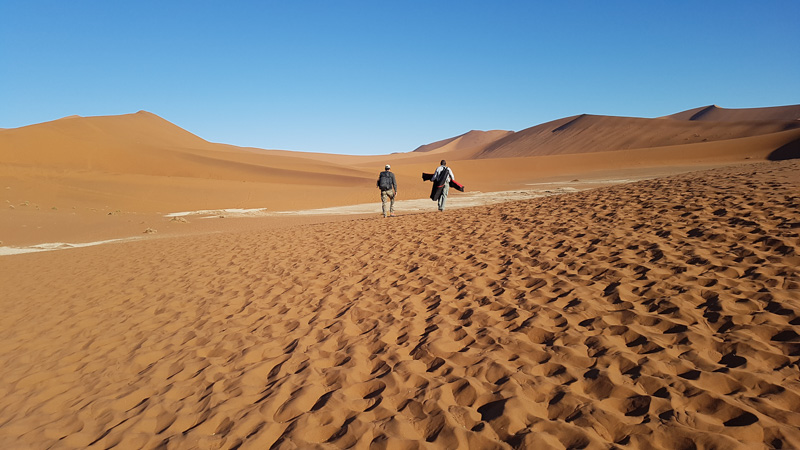
Hiking towards one of the locations in the Namib desert (video still by Awi Rabelista).
The D850 is very well sealed against dirt and dust. The port doors are all very secure, and the gaskets around the card and battery doors inspire confidence. With the D810 I’ve had some issues with dust creeping into the built-in flash construction, resulting in crunchy sounds and quite a bit of dust inside the opening. With the built-in flash removed, this is obviously no longer an issue, but there is now a new concern: the mechanism for the tilt screen. When you flip up the screen, you can clearly see a hinged construction that looks rather flimsy. My first thought was: that’s gonna give me trouble in the desert. But it didn’t. Despite using the tilt option on every shoot, it never got crunchy and kept on working properly. That said, in very dusty or humid conditions conditions, I still prefer to put the camera and lens inside a protective StormJacket cover. They’re very compact and lightweight and I never travel without them.
The ‘D000’ on the dusty ground in Deadvlei, Namibia (video still by Awi Rabelista).
Landscape and wildlife photography cameras need to be rugged and able to stand up to the elements. The D850 definitely feels very solid and certainly doesn’t have that plasticky entry-level-camera-feel. But no matter how careful you are, eventually you will bump or drop it. And that’s going to be the ultimate test for your camera. I once dropped my D3 on a concrete floor, and nothing happened except for a little dent on one of the corners. I still have it, and it’s still going strong. Knowing that you have half of the world’t prototypes in your possession makes you a bit more careful than usual, but even then: accidents happen.
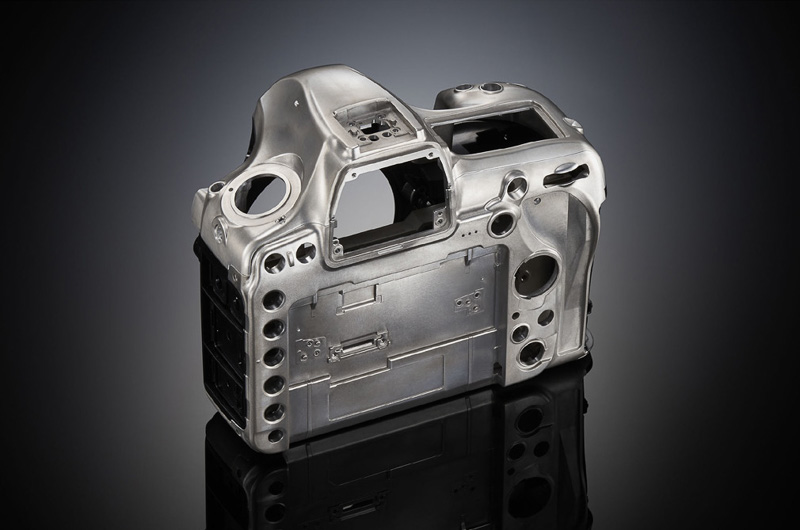
The magnesium alloy body armour of the D850. Not as tank-like as the D5, but getting close.
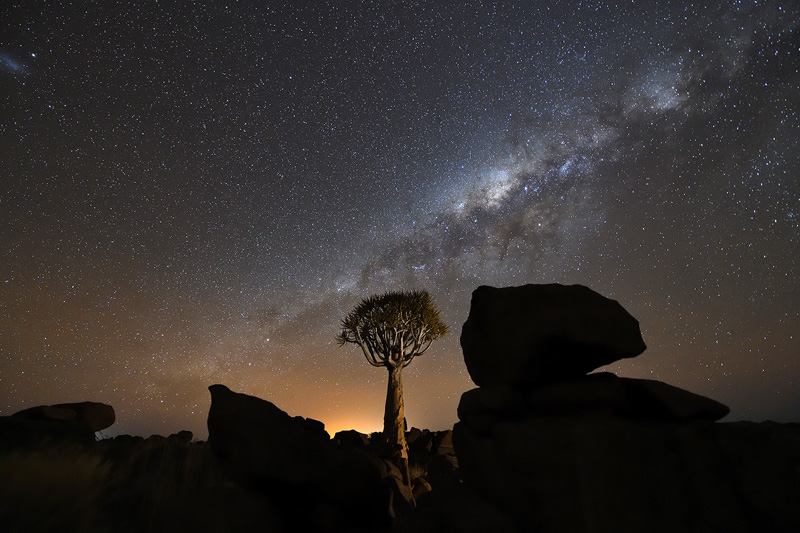
One night in the desert I had set up two motion sliders which had taken me more time than I had anticipated. As the Milky Way was already at the perfect angle, there was no time to waste to set up another camera. I decided to quickly set up my camera at eye level for an easy composition, pointing in the direction of the Milky Way, with a tree sticking into the right part of the frame. Instead of shooting 8K stills, I chose the in-camera 4K time-lapse feature which would give me a finished time-lapse video at the end of the shoot. This literally took me no longer than five minutes, including setting up the light. Then I just pressed Start, and the camera started exposing. I walked back to my car for a few hours of sleep.
The next morning I got up very early to check on all the cameras. The two D850’s on the sliders had reached the end of it, so those sequences were successful. Everything was covered in a thick layer of dust and the tripod and slider sleeves that were next to the setup, were gone. There appeared to have been some serious wind that had blown away the sleeves and that had sand blasted the equipment. Instead of searching for the sleeves and packing up the sliders, I decided to check on the third camera first.
I walked into the direction of where I had set it up, but I couldn’t see it. The camera was on a tripod at eye level so it should be clearly visible from a distance, yet it wasn’t. As I got closer to the tree I had used as a subject, I saw why didn’t see it. The wind had blown over the tripod, and it had crashed onto the hard ground. My heart sunk when I saw the drama up close: the crash had bend the tilt screen which was stuck at an awkward angle, covered in sand and dust. I wiped off the dust, tried to unbend the tilt mechanism and pushed it back into place. It was still working. Surprisingly, the lens was fine. It was very dusty, but no cracks or scratches, and even the sun shade was not broken. Next, I pressed the review button to see what had happened.
The video evidence of the crash scene.
And there it was: a fully assembled 4K time-lapse. The first 11 seconds were just fine, but I could see some movement as a result of the wind picking up, then at 12 seconds, the framing changed dramatically and all you could see were out of focus stars. So the good news was that the camera and lens were not broken and even continued working after the crash, but the out of focus stars concerned me – either the camera or the lens were probably no longer focusing correctly because of the impact. I then removed the camera from the tripod, refocussed on the tree and took a shot. Pin sharp. I was able to use the camera and lens for the entire trip – the only defect was that the tilt screen did not click back into place perfectly anymore. I’m pretty sure that was lucky with the angle at which everything fell down, but it’s still impressive that it all kept working as before.
New features
I won’t get into all the details here, but I will mention a couple of features that I found really useful when working on the Hercules Rising time-lapse.
Silent shutter mode
This is a new feature and it does exactly what it says: no shutter noise. None. When using the silent shutter mode, the mirror is raised and the shutter is open – the camera uses the electronic shutter instead. This is extremely useful for a couple of reasons.
When you’re creating a time-lapse, you’re often shooting hundreds and sometimes thousands of images. Using the mechanical shutter means that you’re seriously wearing your shutter down. When using the silent shutter mode, there is no mechanical wear no matter how many images you shoot. Your shutter will thank you for it.
Also, in this mode the mirror (which is already up) and the shutter (which is already open) cannot cause any camera shake – you’ll get sharper images.
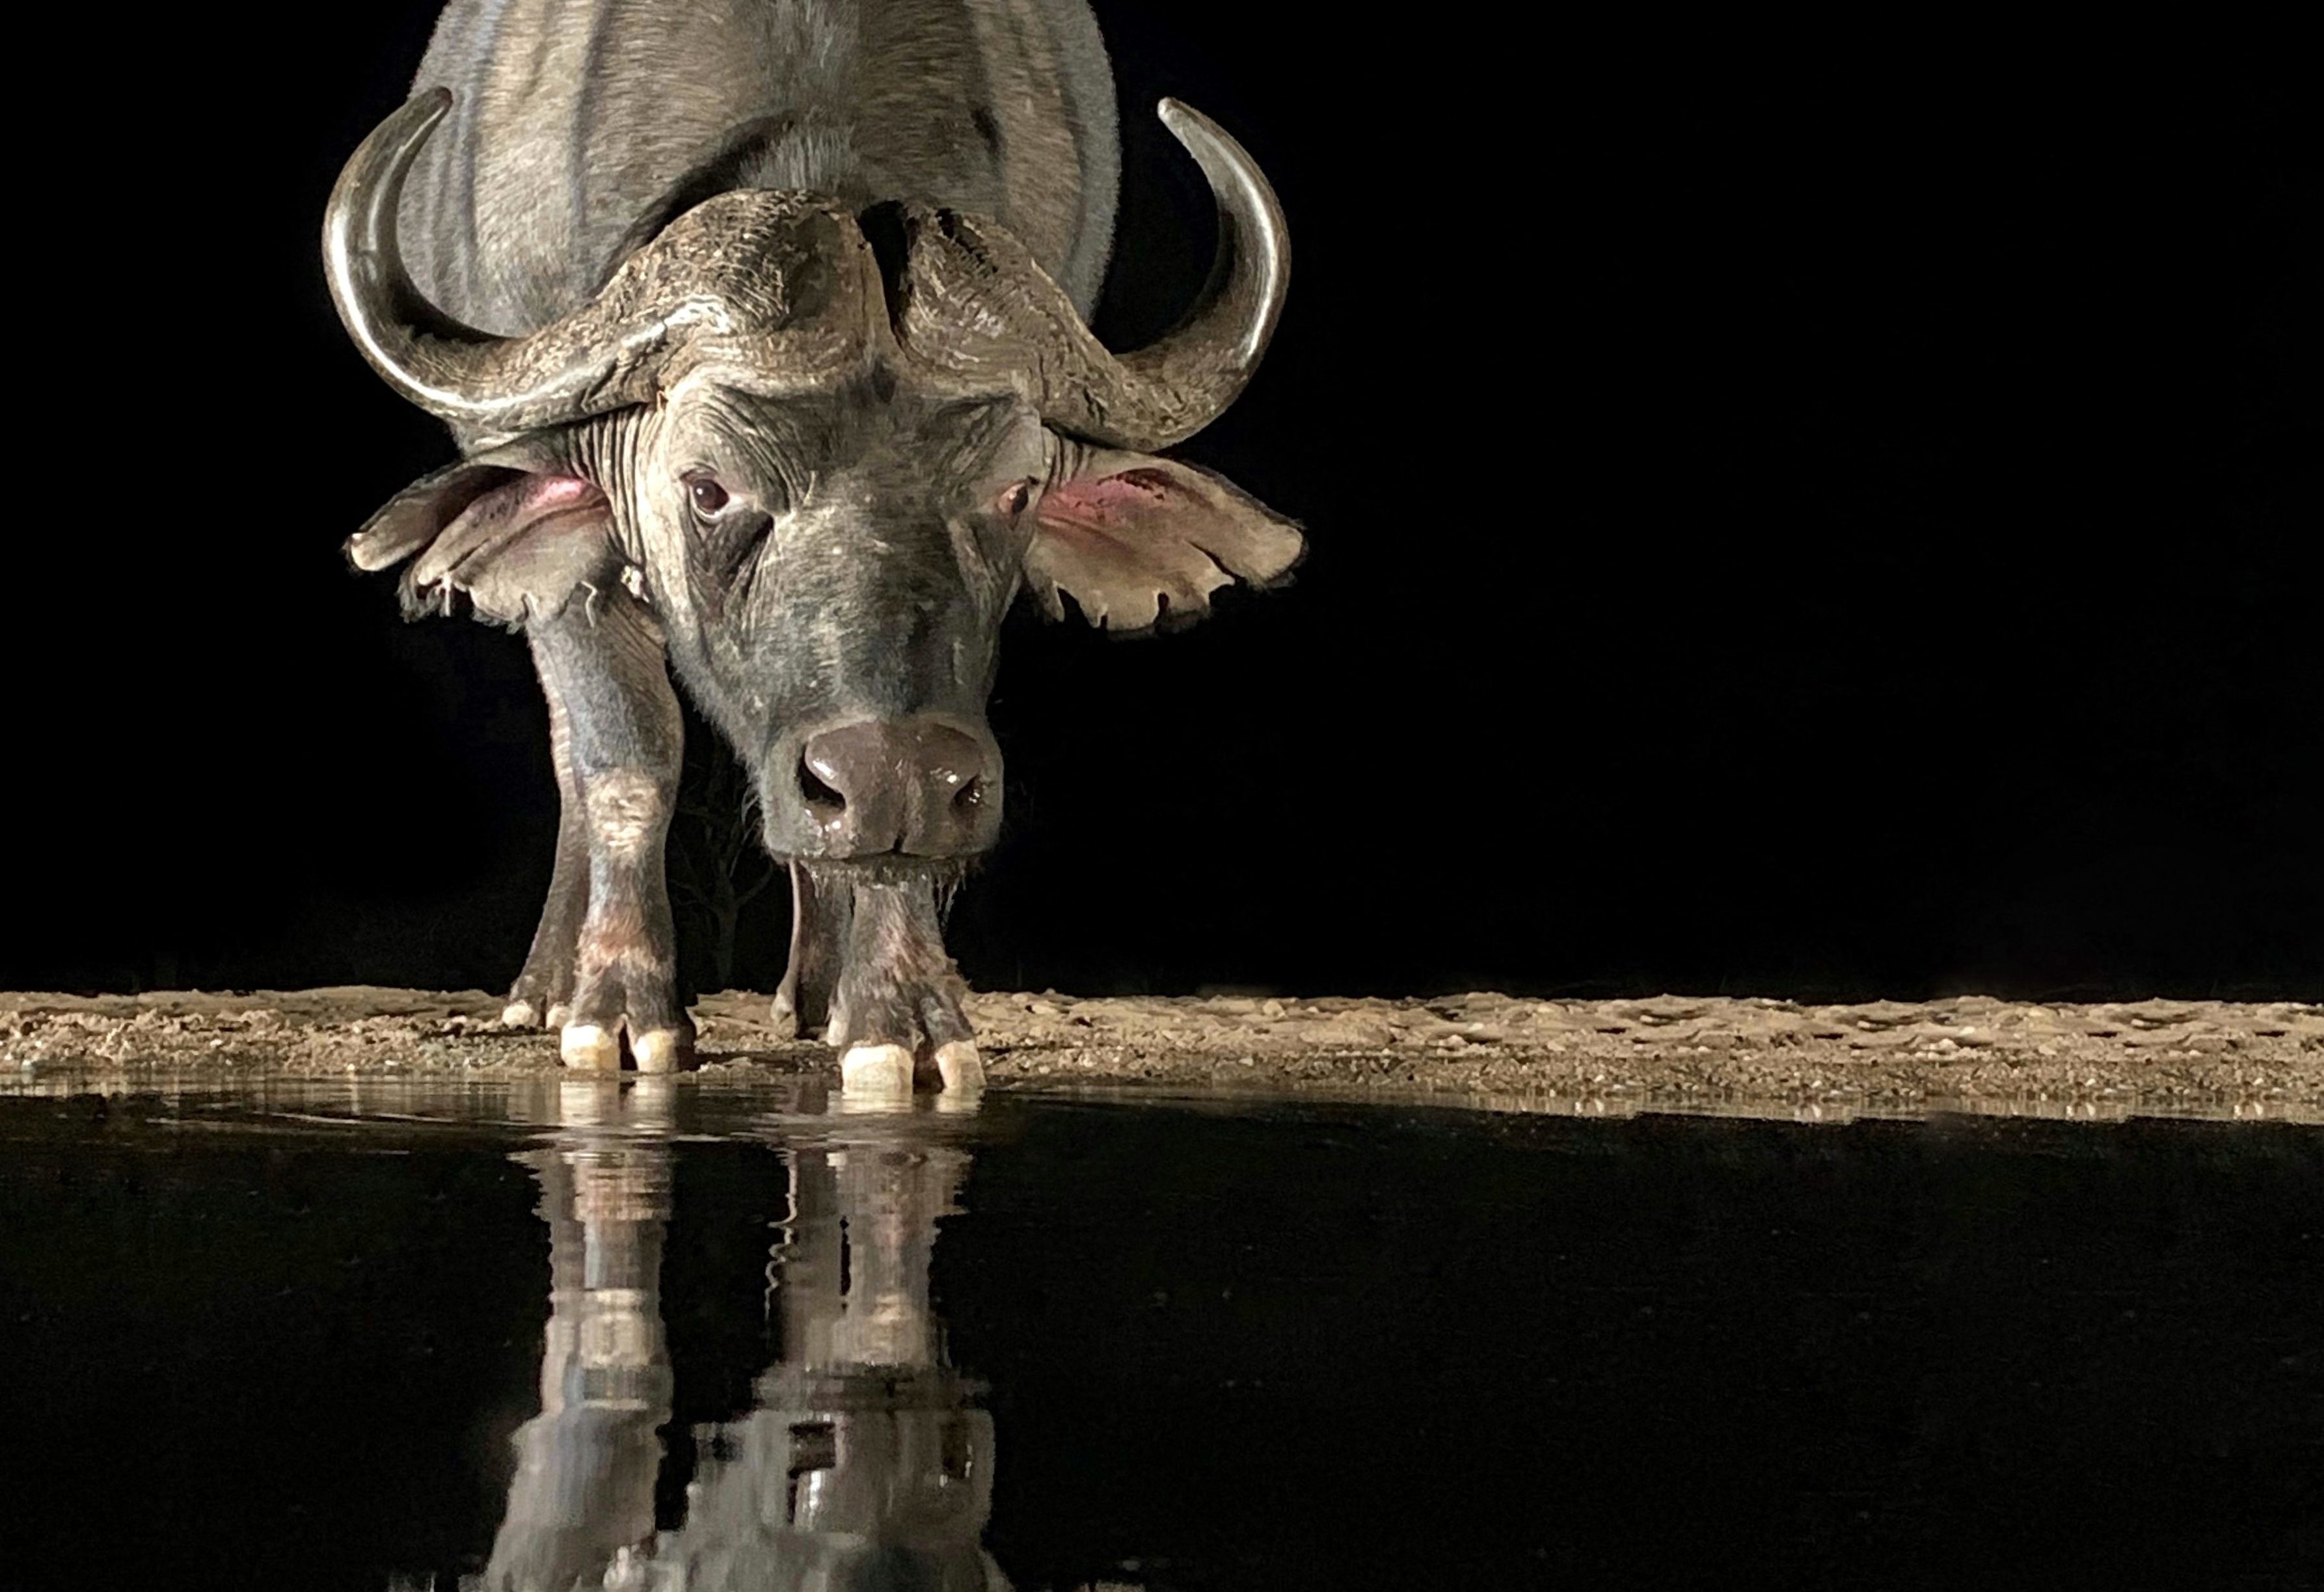
And as the camera is completely silent in this mode, you can use it more discretely. If you don’t want the camera to attract unwanted attention during a time-lapse, this mode will do the trick. No one will realise the camera is actually shooting. For wildlife photographers this is probably even more important.
A few months ago, I spent a few weeks in hides in Botswana and South Africa. The hides are positioned next to water holes at water level, so you can potentially photograph the animals as they come down to drink. However, when they do, they tend to be very wary of any sounds. The Nikon shutter sound has never been very subtle, but even the muted shutter sound of the Quiet shutter mode still spooked some of the animals which then ran off. That’s when I switched to Live View and used the silent shutter mode. This did the trick. No sounds means the animals are way more relaxed and stick around much longer. There are two negatives about this mode: you have to use Live View, and when you’re in continuous mode, you have no idea how many images you’re shooting because you can’t hear the shutter. That said, I got some shots of skittish animals that would otherwise had run off after the first frame.
In-camera 4K time-lapse with moonrise, using the Exposure Smoothing function.
In-camera 4K time-lapse
To create a time-lapse video you typically shoot hundreds (or thousands) of still images that you later have to put together using video editing software. For every second of video you need 25 still images, so for 10 seconds of video you have to shoot 250 frames. If you would like to make a time-lapse but think the post production part is too complicated, then there’s good news: the D850 can shoot and fully assemble a 4K time-lapse for you. Setting it up takes less than 30 seconds. All you have to do is go to the Movie Shooting Menu and select Time-Lapse Movie. You enter the interval, the shooting time, and the frame rate and you’re almost done.
If you’re shooting in any other mode than M, you can also select Exposure Smoothing which will smoothen abrupt changes in exposure (like when you’re shooting with intermittent clouds). Another option you have is to select Silent Photography, and I can’t come up with a reason to not use this function – using the electronic shutter instead of the mechanical one will lengthen your camera’s shutter life and it will eliminate vibrations. The last option in this menu is called Interval Priority, and here you choose whether the camera should give priority to exposure time or interval timing in P and A mode. You should select ON to ensure frames are taken at the chosen interval, and OFF to ensure that photos are correctly exposed.
The video above is a 4K in-camera time-lapse. After I had finished setting up a complicated motion slider shot, I decided to put one camera on a tripod right next to it. I had to move to another location for the next motion slider setup, so I didn’t have much time – you can tell by looking at the composition. But the point is that it is super easy to quickly set up a 4K time-lapse, and as you can see the camera did really well with the changing light conditions.
Checking the effect of the programmed camera movement.
Exposure smoothing
I already addressed this above, but it’s worth noting that abrupt exposure changes have always been a major problem for time-lapse shooters. The smallest exposure change you can set on most cameras is 0.3 EV, but for time-lapse that is a massive jump in brightness, resulting in flicker. Up until now you had to use either an external device, specialised software, or both to control this problem. This is especially the case for night to day and day to night time-lapses. The dramatic exposure changes in those time-lapses has been so difficult to control, that the time-lapse community had named them ‘the holy grail’. Therefore, the exposure smoothing function is an amazing new feature that will make it a lot easier to get smooth results.

At work in the desert in Botswana (iPhone shot by Daniella).
Focus shift
As the Hercules Rising project was primarily focused on shooting night time-lapse video, I didn’t know about this new function until I accidentally found it while scrolling through the menus. For as long as I have been shooting landscape images, I have wondered why a function like this was not already in my camera, so I’m really happy to see that Nikon has added this new function to the D850. We all know how difficult it is to get front to back sharpness with the camera close to a foreground object, or when shooting with long focal lengths. Stopping down to f/16 or f/22 sometimes does the trick, but, losing sharpness as a result of diffraction aside, it often isn’t enough. Shooting multiple images focused at different distances, and later merging these images using specialised focus stacking software, is your only choice. The focus stacking part in post production you will still have to do yourself, but the new Focus Shift function in the D850 now does all the focusing for you.
During focus shift, the camera automatically varies focus over a series of photographs. There are a few settings in the focus shift menu that you need to set before you can press Start, but there’s not much to it. I find that this option works great and saves me a lot of time. What’s really nice, is that you can have the D850 put all your focus shift images into a new folder. Landscape and macro photographers will love this option.
At work in Deadvlei, Namibia. Our cameraman Awi Rabelista is using his D850 to shoot the behind the scenes footage (iPhone shot by Daniella).
The making of
Shortly after Hercules Rising appeared online, I received a lot of emails from people who were interested in seeing how it was done. This is where I will try to explain what I did, and how and why I did it.
Nigh time-lapse photography can be very time consuming and it’s weather dependent – you need clear skies to be able to see the stars. And if you want to see the Milky Way, you best shoot when there’s no moon. As our calendar was not very flexible because of all the photo tours we lead, we only had a few days around the new moon and many days with quite a bit to full moonlight. Shooting in total darkness or with full moon is completely different and offers specific challenges and opportunities.
I firmly believe that great photographs are first made inside your head and not with the camera. Consequently, planning has been a vital part of my photography, allowing me to execute pre-visualised images. With time-lapse photography in particular, many things can and will go wrong, so when time is an issue you need to be as efficient as possible.
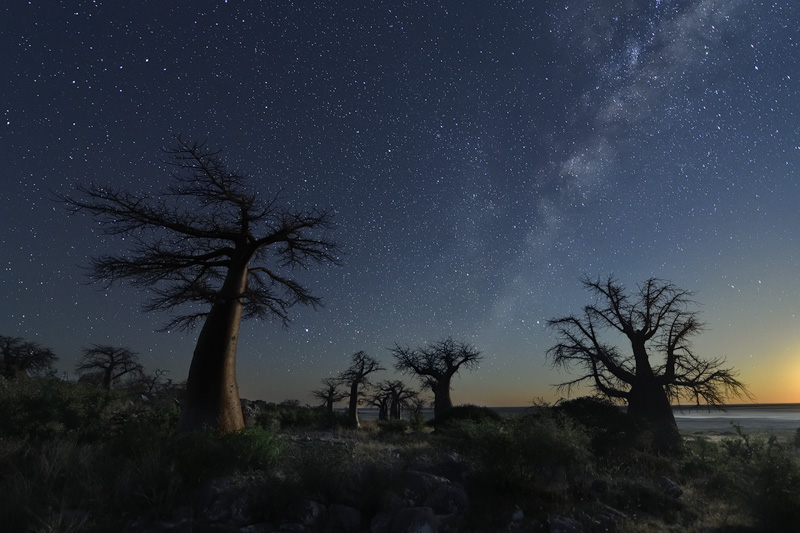
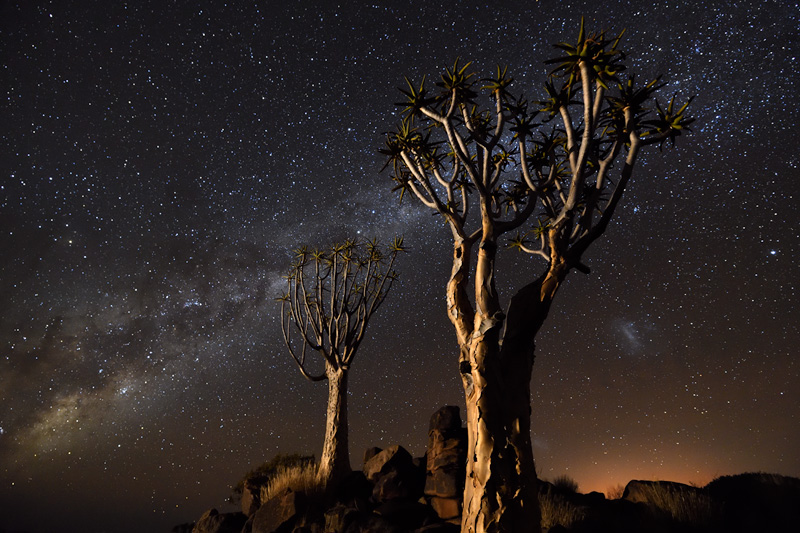
The first thing we did was to decide on possible subjects and then locations. I love trees, so I picked three different species: quiver trees and camel thorn trees in Namibia, and baobab trees in Botswana. The next step was to find out what the specific moon phase was for each day, and when it would rise and set. With this data I was able to pre-visualise what the light conditions would be and, therefore, the kind of images that I could capture. For me, this is the most important part of the artistic process, as this is where I create my visual ideas.

Part of our very detailed shooting schedule that we put together long before we got onto the plane to Africa.
Daniella then put all this data in a single document, including shooting ideas for every location and for each date. This became our plan of action that we used every day. Working this way saves a lot of time. Every day we knew exactly what kind of shot we were going to set up and when we could shoot it.
The biggest artistic challenge for any kind of night photography, is that you can’t see what the scene will look like until it’s fully dark. However, if you wait that long to set up your shot, you will have a hard time getting the right composition and framing. Especially when you’re working with motion sliders and pan/tilt heads, things can get really complicated – both from a technical/programming point of view, as well as the compositions. When you’re shooting stills, you only have to worry about one composition, but when you’re shooting with a motion slider you have to find a good starting composition and a good end composition. Often it was easy finding a location where one of the two would work, but it was a challenge to get both perfect.
If you add up all the time needed for finding the right locations and compositions, setting up the gear, and programming the movements, I would say that the average setup took us three hours to complete. This is why I always use the harsh light of mid day to find the locations and to figure out what the best composition/camera movement/programming is. If at all possible, I like to set up everything long before it actually gets dark. But how do you know what the scene is going to look like when it’s still bright outside?
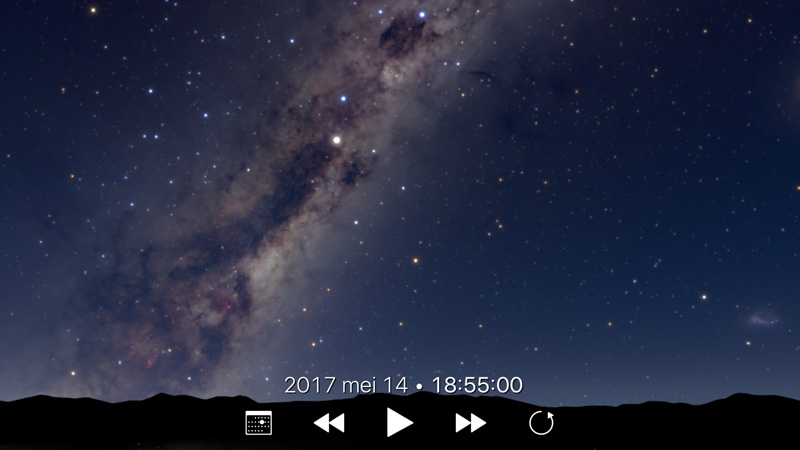
A screen shot of Sky Guide on my iPhone.
The easiest way to see what the night sky will look like at any given time, is to use one of the many available night sky apps. Photo Pills is one of the most powerful apps out there, but for my scouting I prefer the simplicity of Sky Guide.
If I want the Milky Way in my shot, then I use Sky Guide to show me when and where it will appear in the night sky. During the night, the apparent angle of the Milky Way changes as the earth rotates. Using the timer in the app you can see exactly what the angle of the Milky Way will be at any given time. Whenever possible, I like the Milky Way to complement my compositions instead of looking like an afterthought. This means that quite often I wasn’t able to shoot certain compositions because the Milky Way would show up at an awkward angle, or just not in the right place.
Thanks to our detailed shooting schedule, I always knew exactly what I was looking for when we were scouting. If we were going to shoot a Milky Way scene, I basically held my iPhone in front of me with the Milky Way at the perfect angle on it, and only considered locations facing that direction. When I found a location that I liked, I would take a few iPhone shots (and iPhone video to mimic slider movements) to see if the composition would work, and then I went on. Later in the afternoon, I would compare all these iPhone shots and pick the best ones where we would set up our gear for the night. Here are some examples and background info.
iPhone panorama of a location I selected for a moonrise shot.
The Milky Way sequences were relatively easy to set up compared to ones with the moon in it. When you’re shooting with new moon, you know that the light is not going to change so all your exposures will be the same. But when you’re shooting a moonrise or a moonset, you have to guess how bright the moon is going to be and how it’s going to affect the overall exposure. There is no perfect way to calculate this, so I set the exposures for my moon scenes based on experience.
This particular scene was tricky, because I really liked this exact viewpoint, yet I knew that the moon would rise from the right side of the frame – not ideal. I had already used up my two motion sliders for that night, so this was going to be a tripod-based shot. That was not a problem as I only wanted this exact viewpoint. The benefit of shooting off a tripod, is that you can shoot for many hours on end.
When shooting with a motion slider, the speed at which the cart moves determines the speed of the camera movement in the time-lapse, so you can’t really play around with that much – it looks awkward if the camera constantly moves at different speeds in the video. I wanted to keep the camera movements at the same speed throughout the time-lapse, which meant that each shoot would take approximately two hours to complete. The slider shots therefore needed to be very precisely timed in order to get the right angle of the Milky Way, or the right position of the moon. When shooting off a tripod, I could basically start the interval timer an hour after sunset and let it run through the night. This obviously results in a massive amount of (very large!) files, but it’s nice to have so much choice afterwards.
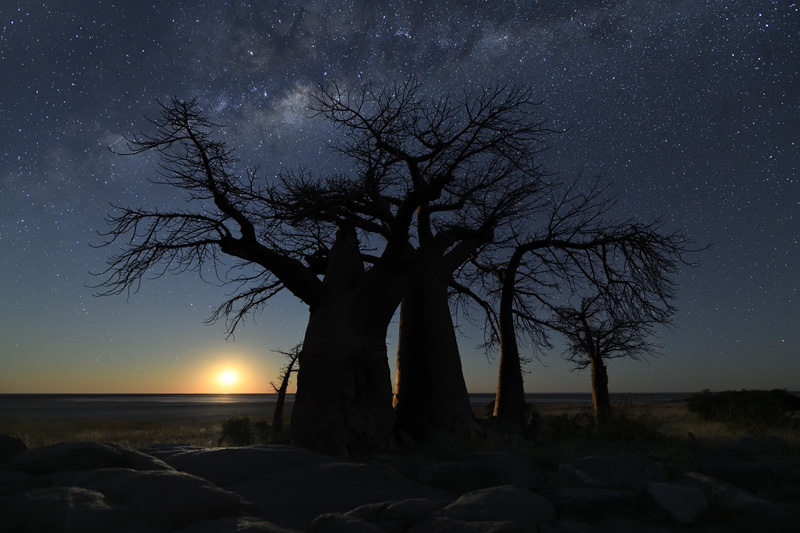
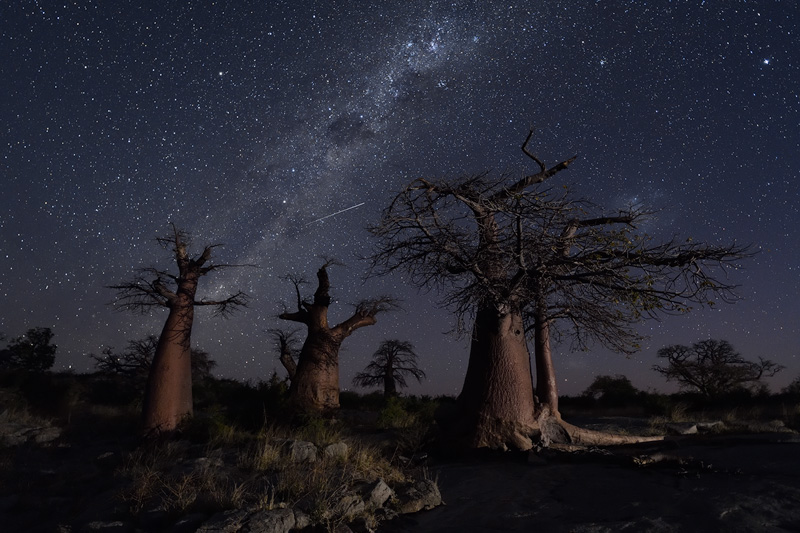
D850 still frame from Hercules Rising.
This still frame is from the very start of the sequence. I later decided not to use this part, as I prefer the bit where the moon is already up and illuminates the landscape. There was not much left of the Milky Way by that time, but then again this shot was never about the Milky Way. Setups like this I just let run for as long as the batteries will last, and with the D850 and the battery grip that meant that each morning the camera would still be firing away.
D850 still frame from Hercules Rising.
This is one of my favourite slider shots from the video as there is so much depth in it. It was also one of the most difficult shots to set up, because of depth of field issues.
The idea was to move in as close as possible towards the foreground tree, knowing that the wide angle perspective of the 14-24/2.8 would add a nice 3D-effect to the scene. But when you’re shooting at f/2.8 your depth of field is limited, especially when your foreground is very close to the lens. One of the challenges of shooting with the D850 is that you have even less depth of field – a result of the massive amount of pixels. The first thing I noticed when shooting with the D850, was that I had to stay further away from my closest subject than I was used to with my D810.
The biggest challenge was that with a scene like this, you can’t check if the stars are sharp – they’re not there yet. So I had to wait until the first stars came out to if they were sharp, and then they weren’t. I then had to move the whole setup away from the foreground tree to increase my depth of field, which is a real pain if you just spent an hour fine-tuning it. Of all the challenges I’ve had during this project, depth of field and weather conditions were the biggest ones.
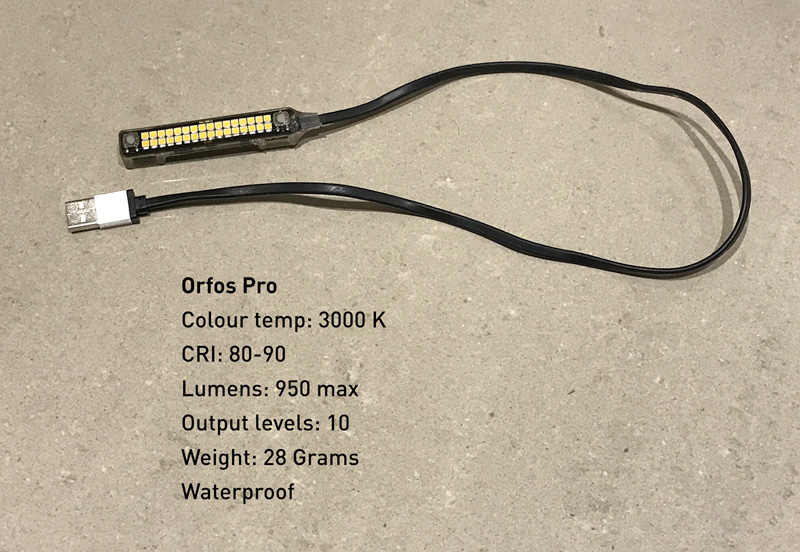
Prototype of the Orfos FlarePro LED light.
In all the sequences with moonlight, I have used the moon to provide the illumination for the foreground and the distant landscape. For the moonless nights however, I had to add some light of my own. For Hercules Rising I have exclusively used the FlarePro LED lights by Orfos. These lights are amazing for several reasons:
-They’re small and extremely lightweight. I could literally put four of them in my pockets without noticing it.
-3000K is relatively warm, which means you can shoot at a cooler white balance without ending up with blue light.
-They have 10 different output levels, and can blast out 950 Lumens max. That’s a lot of light, which comes in handy if you need to illuminate a large area.
-The light is super diffuse, so no hot spots.
-The FlarePro does not have a battery compartment, but a USB cable. This means that you can add any external battery with a USB port. The bigger the battery you attach, the longer your light will last. This flexible design is pure genius.
-They’re completely waterproof, except for the USB plug.
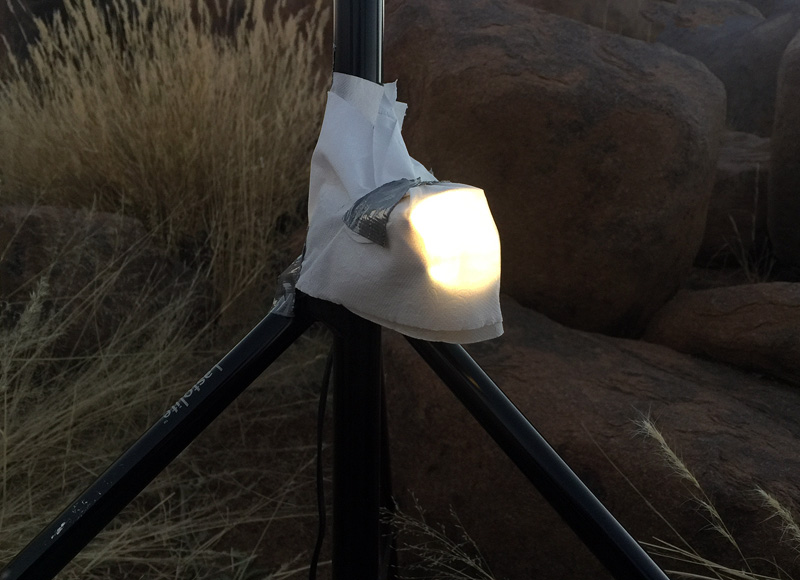
The Orfos FlarePro taped to a light stand. A few sheets of toilet paper for extra dimming.
My only concern with these lights is the fact that even at the lowest output setting they are still quite bright. Most of the times it was just a matter of moving the light further away from the scene, but sometimes that wasn’t possible. In those cases we ended up using toilet paper to dim the light beyond its lowest setting. Very high tech. This worked fine, but you have to realise that the more paper you put in front of a light, the warmer the colour temperature of the light gets.
The FlarePros that I used were still prototypes, but they are now available online.
iPhone shot of a motion slider setup.
For this shot I was pointing the opposite direction of the Milky Way. I really liked this constellation of trees and the texture in the foreground, so that’s what this shot is about. The compositional challenge was to get as much separation between the trees as possible, and then there was also the depth of field challenge. I wanted to have the camera slide down at a moderate angle towards the ground, to the point where the camera got really close to it. So close actually, that it was impossible to get front to back sharpness. In the end I decided to compromise and accept a bit of unsharpness in the foreground, knowing that in post production I could crop off most of it to get the 16:9 aspect ratio.

D850 still frame from Hercules Rising. AF-S 14-24/2.8 @ 14mm, 25 sec. @ f/2.8, ISO 3200
This is the first frame of this sequence, where you can still see the afterglow of sunset above the dunes in the background. I positioned a FlarePro to the right of the frame to add some light on the trees and to bring out the texture in the foreground.
The slider movement is subtle because the angle of the slider needed to be small to prevent getting a high horizon. The great thing about shooting at 8K is that you have the option of adding additional movements in post production without any loss of quality. In this case we used the full 8K frame inside the cropped 16:9 matte and simply moved the entire image upwards during the scene. The effect is a combination of a 3D (slider) and a 2D (post production) movement, which works really well.
Motion slider setup with pan/tilt head.
Here you can see the D850 mounted on the Sapphire Pro pan/tilt head, on a horizontal slider. I don’t like complicated camera movements in a time-lapse, so whenever I used the Sapphire Pro I tried to use it in a very subtle way, and only to achieve a specific effect. In this case I wanted to keep the tree on the left side of the frame while the camera moved to the right. The only way to keep the tree on the left side, was to have the camera pan to the left during the slider movement. In the time-lapse you will hardly notice this extra camera movement, and that was precisely the plan.
D850 still frame from Hercules Rising.
For the actual sequence, I used the 14-24/2.8 wide open and positioned a single light at a fair distance from the tree. The FlarePro has a very wide and diffuse beam, so it nicely illuminated the entire desert floor. The space to the right side of the tree is there for the Milky Way. As with the previous shot, getting enough foreground sharpness was a challenge, but I was able to frame it such that I could crop off the out of focus bit in post.
Test run.
During the post processing of Hercules Rising we worked with two different soundtracks. One we had already used for the short teaser video, the other was new. One of the soundtracks was a bit longer, so we were able to fit more footage into that version. This particular scene was used in the teaser video but didn’t make it into one of the final versions because we had to choose between two very similar scenes. The test run video clip above is from a scene without any moon – the camera moves down on the slider, and as it gets closer to the ground it tilts upwards. I used the 14-24 for that shot.
D850 still frame from Hercules Rising. AF-S 20/1.8, 25 sec. @ f/2.8, ISO 1600
The image above is a still frame from the same location, but this one was shot at moonrise off a tripod with the AF-S 20/1.8. I was unfamiliar with this lens, but Nikon suggested that I tried it, and I’m glad they did. It’s a compact, lightweight lens, very sharp, and it’s great for shooting into the light – excellent flare control. Typically, when you’re shooting into the sun or the moon, the more you move the light source away from the center of the frame, the more lens flare you get. As I knew exactly where the moon was going to rise, I selected the 20/1.8 for this shot. Lens flare is fairly easy to remove from a still image, but to remove moving lens flare from a time-lapse is very difficult.
Set up with the D850 on the SapphirePro (iPhone shot).
Although the SapphirePro is mostly used to add two additional axes to a motion slider, I thought it would be interesting to use it on a tripod. The idea was to set up the camera close to a tree and point the lens straight up towards branches. Then, as soon as the moon started to rise, the camera would tilt down at the same speed as the moon (keeping it out of the frame, preventing lens flare) to reveal another tree. I knew this would result in quite a bit of distortion, but I thought it could be a nice addition to the other camera movements I already shot. There are some clouds in the scene that caused flicker towards the end of the sequence that were removed in post.
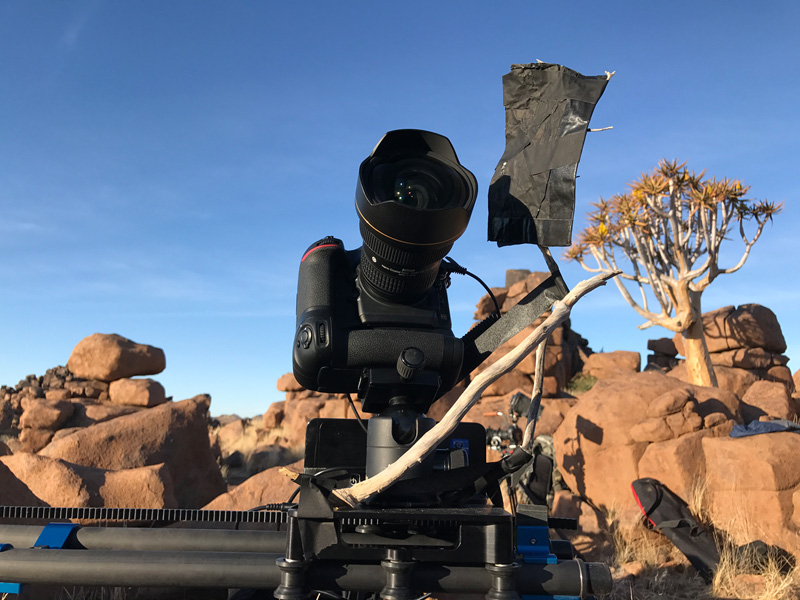
Custom made low tech lens flare prevention construction.
When you’re shooting a scene with moonlight, there are several things to consider. First, shadows. If the moon rises somewhere behind you, it will hit your setup and create a very long shadow. Another one is lens flare. Some people like lens flare, and even though I don’t necessarily hate it, I don’t think it works in a time-lapse like this. So every time I set up my gear for a night shoot, I had to check where the moon would rise exactly and whether it could potentially cause any problems.
When I was setting up one of the scenes for Hercules Rising, I was aware that the moon would rise almost 90º to the camera and that it would hit the lens at an extreme angle. Those typically cause the most severe lens flare, so I needed to prevent that from happening. I didn’t have a fancy flare prevention thing, so I decided to make my own. A few sticks and some gaffer tape did the trick.
The only other way to prevent lens flare in this scene would have been a different camera angle, but that would have ruined the composition. If you look at the time-lapse video, it’s the scene with clouds moving in and a slider movement from left to right.
The end of a test run with the D850 on a motion slider, moving down.
The image above shows what proved to be the most frustrating scene to set up. The idea was simple: the D850 would slide down on a slider and, as a result, the rocks in the foreground would seem to move upwards while framing the tree in the background. The test shots I took with the 14-24 looked very promising, but I saw that I needed to be very close to the rocks to create enough space around the tree. Another depth of field challenge, but this was the hardest one.
With the foreground being so close, setting up was a game of inches. The slightest movement of the setup would cause massive changes inside the frame, so it took a long time getting it right. As soon as the first stars came out, I was able to take a test shot to check the depth of field – not enough. Moving back was not an option, so I tried to move the focus a bit further into the scene. That resulted in sharp stars, but now the rocks were no longer in focus. No matter what I tried, it was either or.
First run without additional lights on the foreground.
When I thought I finally got it, I started the sequence. Two hours later I checked the results, and I was still not happy. I had to do it again. For the first run I didn’t use any lights for the foreground, and I decided that it would probably be better with some light on the rocks. So that’s what I tried for the second run the next day.
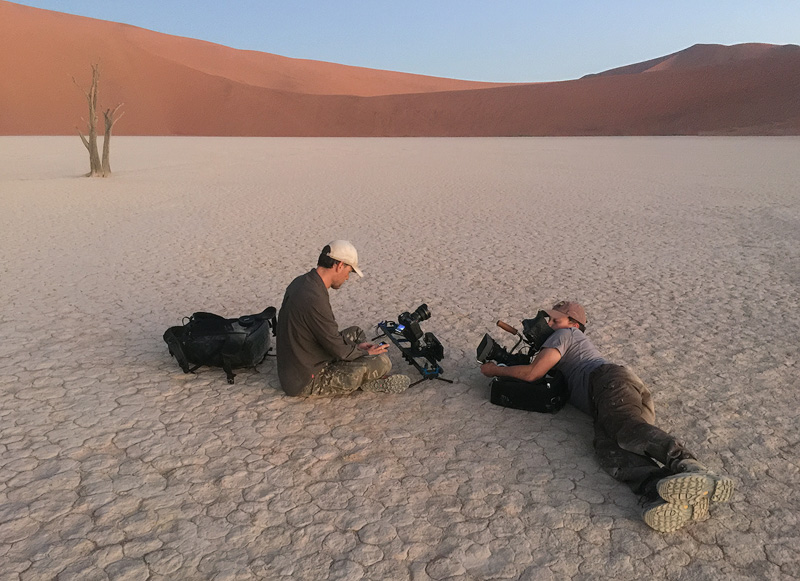
Time-lapse of setting up a time-lapse, by Steve Leavesley.
By the time we set up for the third run, we were pretty fast. In the little time-lapse above you can see how Daniella and I set up everything in no time. We marked all the spots for the tripod legs with little stacks of rocks, which made it a lot easier to get everything in the right place.
Don’t ask me why, but the second run also didn’t give me the depth of field I needed. So take 3. This time I stopped the lens down to f/4 and that seemed to do the trick. I really like the 3D effect of this scene, so in the end it was worth the trouble.

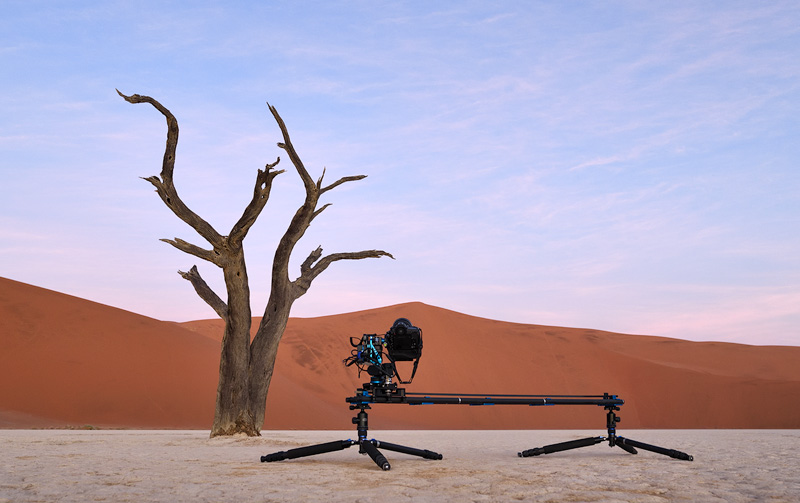
iPhone shot of one of the Hercules Rising setups.
The shot above shows my setup for a fairly simple shot where the camera was mounted on the Sapphire Pro head and on a horizontal slider. The idea was to have the camera move from right to left on the slider, and to have the pan/tilt head ‘follow’ the rock. This way the position of the tree and the rocks would not change, despite the camera movement.
We used two FlarePros to light this scene – one for the rock and the foreground, and one for the tree. I didn’t want to have the same amount of light on everything, because it would blend the foreground and the midground too much. To create more depth, I moved the light for the foreground pretty far away to make it softer, and I used the other light close to the tree to make stand out more.

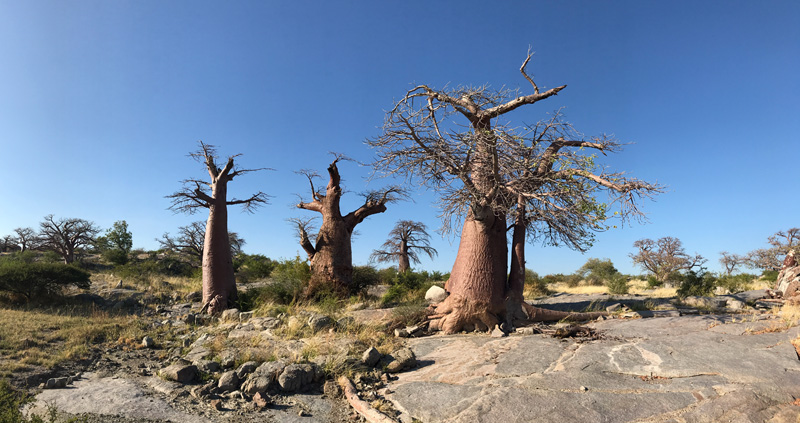
iPhone panorama.
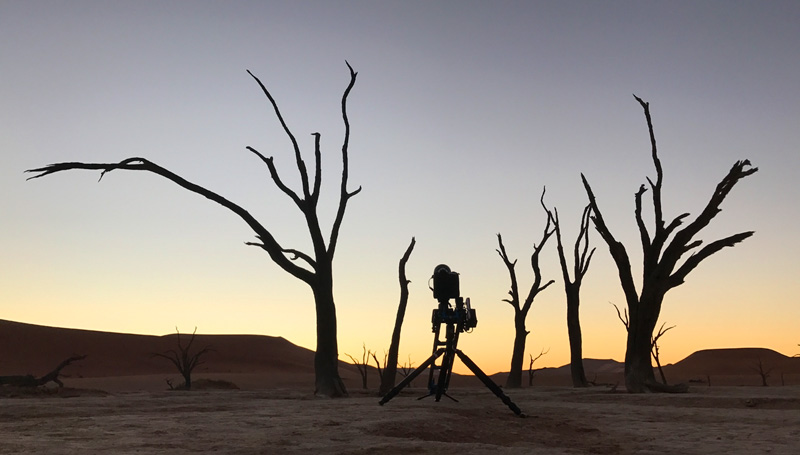
This is one of the many iPhone images I shot on this location. I really liked these three trees, so I spent quite a bit of time trying different angles and lenses. Initially, I had framed a shot with a lot of foreground because I knew that on that night there would be a lot of moonlight. I had pre-visualised a scene where the long shadows created by the moonlight would move across the rocks, and this seemed to be the perfect spot to try this. As the sun dropped, I shot the pano above where I hid the sun behind the middle tree. The stark silhouettes this created were really nice, and I wondered if I could something similar with a rising moon.
Clearly, it’s a lot easier to set up a motion slider for sunset than for moonrise. When you’re shooting a sunset, that means the sun is already out there and you can actually see it. But when you’re setting up for a moonrise, you have to know exactly where the moon is going to rise. In this particular case, it was even more critical because I wanted to keep the rising moon behind the middle tree for as long as possible.
As the moon rose, it moved to the left, so I decided to have the camera slide in the opposite direction to compensate for that. If I could have the camera move to the right at exactly the same speed as the moon would move to the left, the moon would stay hidden until it appeared above the tree. We started very early in the day as this was a time-consuming and precise setup.
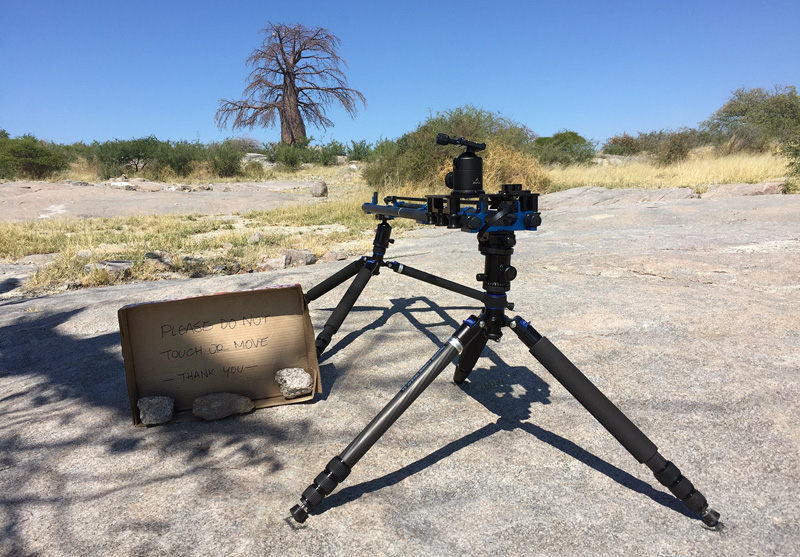
Please do not move or touch. Thank you (iPhone shot).
When we did, I didn’t feel like sitting next to it for five hours waiting for it to get dark, so we decided to leave the entire setup and go back to our tent. However, there were a few tourists in the area and I was worried that they might touch it, or worse, move it. So I decided add a little sign: Please do not move or touch. Thank you.
When we returned later that afternoon, the entire set up had been moved. The bastards. Luckily, I always expect the worst, so I had made little markings with charcoal around the tripod feet. Everything was screwed tight well, so I was able to put the entire setup back without having to make any adjustments.
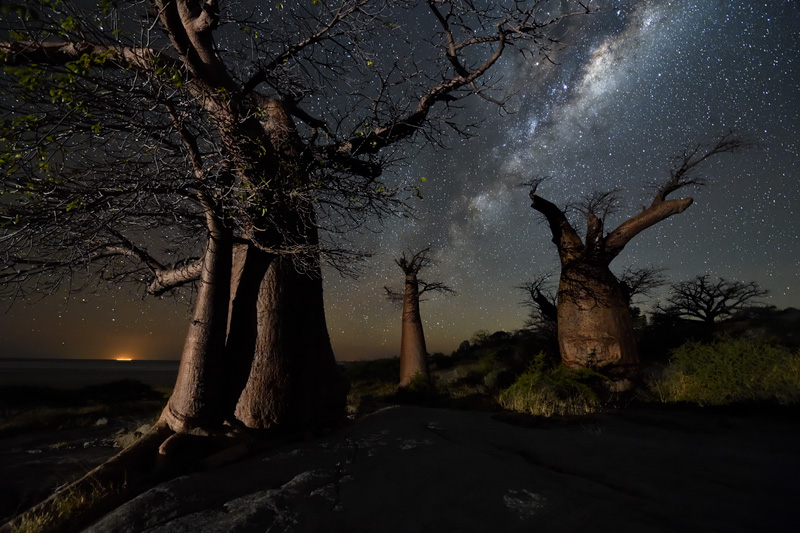
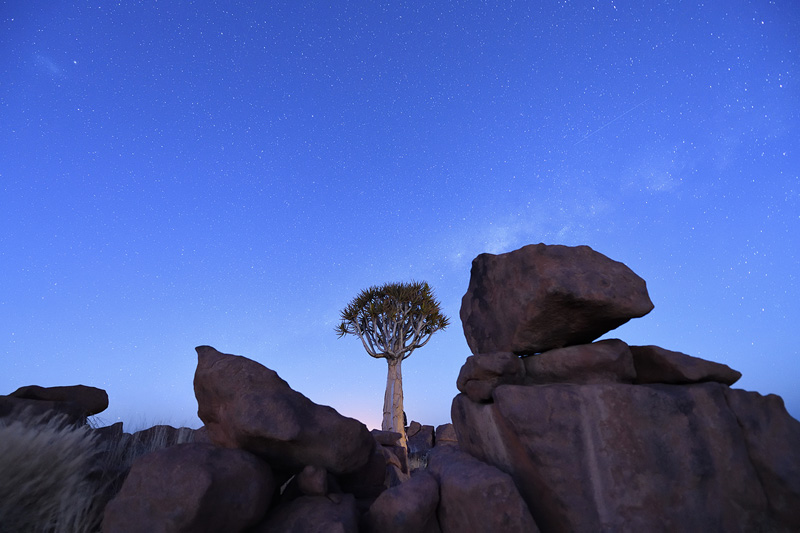
D850 still frame from Hercules Rising. AF-S 14-24/2.8 @ 14mm, 25 sec. @ f/2.8, ISO 1600
Apart from getting the precise position of moonrise and calculate the right camera movement to keep the moon behind the tree for as long as possible, there was another more familiar challenge: depth of field. For the final composition I wanted to be much closer to the biggest tree as to better show its branches and the texture of the bark. I also wanted to show a good bit of the bedrock in the foreground, because that’s where you would see most of the shadows moving. The image above was actually a test shot to see if the tree and the stars were in focus. To be able to better see the detail in the bark, I asked Daniella to hold a FlarePro to the left of me. I like the effect for this still, but for the time-lapse sequence I decided to use no other light source than the moon.
iPhone panorama test shot.
This was probably the easiest sequence to set up. The camera is at eye level on a tripod, so all I had to do was fine-tune the framing, and wait for darkness. I was at a fair distance from the trees, so it was nice to not have to worry about depth of field this time.
My main concern was to get as much separation between the trees as possible and to make sure that there would be enough room within the frame for the Milky Way.
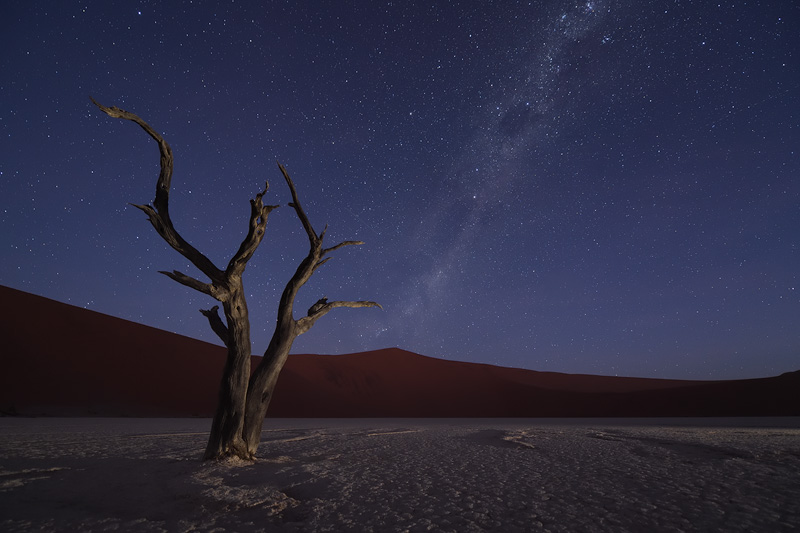
D850 still frame from Hercules Rising. AF-S 14-24/2.8 @ 18mm, 25 sec. @ f/2.8, ISO 3200
There would be no moonlight that night to illuminate the landscape, so I had to use my own light. We ended up using a single FlarePro that I placed at a fair distance from the main scene to be able to get light on all three trees. As it was going to be a dark night, I set my ISO to 3200. At this sensitivity you don’t need a million lumens to light your scene, so a single light with a moderate output will often do.
Post production
During the entire shoot I was not able to use Adobe Lightroom, because it couldn’t read the D850 raw files yet. To be able to check what I had been shooting and do some minimal post processing in the field, Nikon gave me beta versions of both Nikon ViewNX-i and Capture NX-D. That worked fine, but when we arrived back home with all the material (3.65 TB!) Lightroom was still not ready for the D850. Therefore, I had to do all my raw conversions and post-processing in Capture NX-D. I won’t lie: I wasn’t pleased. Not only is NX-D a lot slower than Lightroom, the beta version was even more so, it was unstable, and not all features were working. In the end it all worked fine, but I had to get used to a more limited raw conversion workflow.
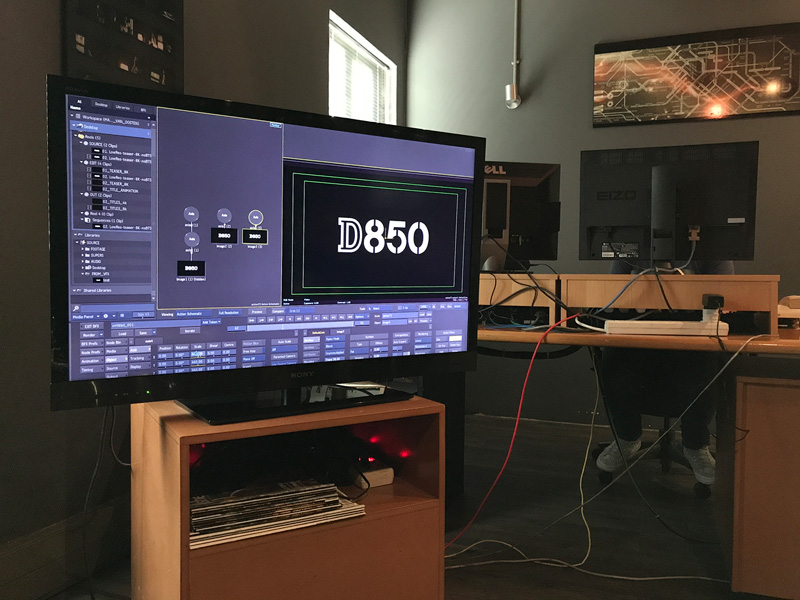
In the edit suite, working on the teaser video for the D850 (iPhone shot).
My workflow was as follows: I opened the first and the last images of a sequence and decided what kind of look I wanted. I then fine tuned the white balance and the overall exposure, and I checked the Astro Noise Reduction option. This option reduces the randomly spaced bright pixels that often occur in images of stars captured with long exposures. Cropping at this stage makes no sense, because what looks good in one shot may not look good a few seconds later in the scene. This is why I decided to do the cropping to the 16:9 aspect ratio at the post-production company. I didn’t crop anything from the sides to keep the maximum 8K width, so only from the top and/or bottom.
At first, Daniella and I thought about editing everything ourselves, just like we did for Namibian Nights. But after I had batch processed the first scene and tried to play the quickly assembled Quicktime movie, my MacPro couldn’t do it. Processing 8K still images is no problem for any computer, but playing 25 still images per second at 8K certainly is. Looking at the tiff files that may come as no surprise: my average 16-bit tiff was 333 MB. Our decision proved the right one: even at the post-production company they struggled with the 8K playback.
Daniella had already made a low res edit with soundtrack, so the post-production company first needed to replace the jpegs with the 16-bit tiff files. Knowing what the order of the scenes was, we could grade every scene so that the overall colours would match better from the one to the other. This was the most important part for me, as this is where you create the final look of the video. Next, we finalised the edit and the sound and made the final renders.
We are very happy with the result. The amount of detail and the lack of noise of the 8K material is very impressive. We are already thinking about our next time-lapse with the D850.
At work in Namibia.
The End
Well, that’s it. I hope you enjoyed reading about my experiences with the D850, and about how Hercules Rising was made.
My final words on this camera: it’s not perfect, but it’s getting really close and it’s quite simply the best DSLR ever made. A massive amount of pixels, medium format-like dynamic range, excellent high ISO performance, the same autofocus system as the D5, 9 fps with the battery grip (and over 5,000 shots per charge!), a buffer that holds 170 raw images (12-bit), silent shutter mode, exposure smoothing, focus stacking mode, illuminated buttons, tilt screen, and in-camera 4K time-lapse. I am an all-round nature photographer who likes to shoot both landscapes and wildlife, and this camera is the perfect fit.
Special thanks
I would like to thank my wife Daniella for her endless support and meticulous planning, for giving me inspiration when I had none, and for keeping me on track when I was about to derail – I couldn’t have done this without you.
I would also like to thank Awi Rabelista for shooting all the behind the scenes video on the D850, for lending an extra set of eyes, and for being a great travel partner – you rock.
And lastly, I would like to thank these companies for their support: Nikon, EIZO, LaCie, Dynamic Perception, LensCoat, and StormJacket.
About the author
Marsel van Oosten is a professional nature photographer from The Netherlands. Together with his wife Daniella Sibbing he runs Squiver, a company that offers specialised nature photography tours all over the world for people of all experience levels. www.squiver.com
Awesome work! The result really came out incredible! I just have to know which holy grail ramping method you used?
Thank you Derek! Actually, I didn’t use any holy grail ramping method other than the in-camera Exposure Smoothing function. And most of the scenes that look like holy grail ramping are just one single exposure. You just have to know how bright the moon will be (depending on the moon phase) and select the right exposure for both the dark and the bright part. Sometimes I ended up brightening the darker part of the scene slightly in post production. The fact that you still don’t see any noise in those scenes shows how good this camera is.
Unbelievably detailed and interesting information…as usual, from Marsel van Oosten explaining how to accomplish a night time video. You have produced some magnificent footage for Nikon D850. Fun to watch your adventure. You should be nick-named Hercules (for lugging all of that equipment through the airport) and Daniella… Herculette (for the same reason)!
Thanks Marie – happy you like it. Herculette, I will let Daniella know! :-)
Fantastic artistic and technical work, Marsel. Truly inspiring!
Daniella really shines as well.
Thank you Steve – couldn’t have done it without her!
Loved the video itself and the detailed background is super. You haven’t quite converted me to the dark side yet but in camera time lapse and focus shifting are highly tempting. Nikon made a good selection of photographer! I’m looking forward to China.
Thank you Rich, I’m happy you like it. As for crossing over to the dark side – you already have a dark side :-) See you in China!
Thanks for sharing all procedure of making this timelapse! The result was honorable and marvelous!
Thank you Nima!
Excellent article and a superb result from both of you and the team. All the best – Alister
Thanks so much Alister, we really appreciate that :-)
Amazing! Thanks for sharing. Totally in awe of you guys!!
Thank you Lisa!
Wonderful! An epic work with exceptional results. Marcel, I thank you for the technical information and your personal impressions that are a source of invaluable information. Thank you for your effort and the information you have given us.
You’re welcome Francisco, happy you liked it
Marsel, I’ve never seen before so much great pictures. To read about your work was very interesting.
Thank you very much Bernard!
Thank you for sharing this wonderful motivational article on time lapse. I can’t wait to try out this feature on my D850.
BTW you would be able to share your shooting schedule so that i can learn from it?
Thank you again.
Dear Ferenc,
The reason I blurred part of the shooting schedule, is because there is some location info in there that I would rather not share. As for the rest, it’s basically info on when and where the moon rises, what the moon phase is, when astronomical twilight starts and ends, and shooting ideas.
Such great information and personality. I really enjoyed reading this. It was fun to hear you talk about it in November, but this post just added to it. All the background aside, the video is really awesome. I have shared it numerous times with friends and jaws repeatedly drop as people view it. Congratulations and thanks for sharing!
Hey Steve – thank you for the kind words, happy you like it! Daniella and I wish you all the best in 2019 – see you in China!
Hi Marsel, ik heb net jullie Hercules blog met veel plezier gelezen. Wat een mooi project, iets om trots op te zijn. Tot snel. Groetjes, Willem
Good to hear from you, Marsel.
Yes, great technique but your signature has always been one of class.
Congratulations.
We miss you a lot ;-)
Good to hear from you too Ramon – long time! Thank you for the kind words, hope you are well.