

Review: Gura Gear Chobe 2.0 laptop/camera bag
Two of the gear-related questions I get asked most are 1) what camera bag do I use, and 2) how do I get all my camera gear into the plane as carry-on luggage.
1) The camera bag
Every nature photographer, whether it’s landscape or wildlife, is on a never-ending quest for the perfect camera bag. In case you’re one of them: it doesn’t exist. There’s a ton of camera bags out there that downright suck, and there are a few that are very good, but none of them is perfect. There are so many factors that come into play when choosing a camera bag that it’s virtually impossible to find one that ticks all the boxes. Not only does it matter what kind of gear you want to put into it or how you want to pack it, the kind of activity you use it for and your physical build are also essential things to consider.
After having tried many different bags over the years, the bag that checks most of the boxes on my long list of camera bag criteria is the Gura Gear Kiboko 2.0.
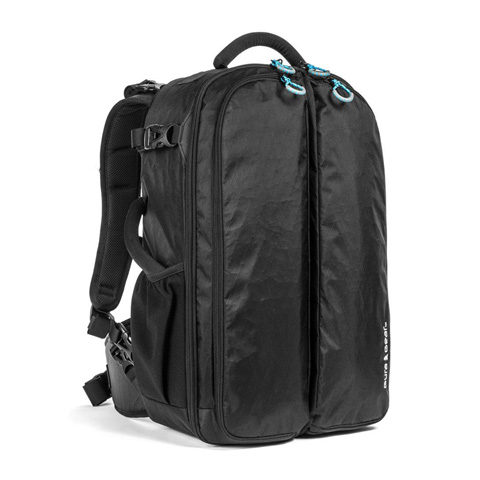
My favorite camera bag: super light, spacious, and comfortable
The Gura Gear Kiboko 2.0 bag has a clever butterfly opening that gives fast and easy access to my camera gear, and it’s much more spacious than other bags. This has been my favorite camera bag for as long as I can remember. It’s basically indestructible, super lightweight, and effortless to pack. I can fit my 180-400 — a hefty telephoto lens — with a D5 attached easily on one side of the bag. I can then fit a 70-200/2.8 with a D850 attached on the other side of the bag and still fit the Z7 with a 24-70 S lens attached in the same compartment. I like to keep my lenses attached to the bodies for quick access and minimize dust on the sensors.
So can I fit all my camera gear in this bag?
Sometimes I can, but often I can’t. If, for example, I want to bring not only my 180-400 but also my 80-400 or my 500 PF because they are easier to handhold, then I have a problem — not to mention the fact that I have quite a lot of other gear that I don’t want to put in my check-in luggage. Bags don’t always arrive at your destination (and replacement gear is often not available), so everything that I need for my photography I take with me into the cabin: ball head(s), flash, brackets, chargers, batteries, external drives, cables and cords, laptop, etc.
That brings me to the next question.
Photographers hate flying because of the cabin luggage limitations
2) How do I get all my gear into the plane as carry-on luggage?
Almost all airlines allow one piece of carry-on luggage and one personal item. They can be pretty strict on the carry-on piece’s size and weight but tend to ignore the personal item. A laptop bag is considered a personal item, and this is my secret weapon. My laptop bag is an extension of my camera bag.
Nine years ago, I bought the Gura Gear Chobe bag, and I have been traveling with it on every trip ever since. It is my most used but also my most important bag — in it are my laptop, my external drives with all my processed images and my images from the trip, and my passport and travel documents, for instance.
Considering that I am on the road for nine months every year, my Chobe still looks great after nine years of intensive use. The video clip above shows the bottom of my 9-year-old Chobe — there is some visible wear, but surprisingly little. The material is the same as on the Kiboko — virtually indestructible. Only the handles have worn down over all those years, so when I heard there was a version 2.0 coming out, that was an excellent excuse to get a new one.
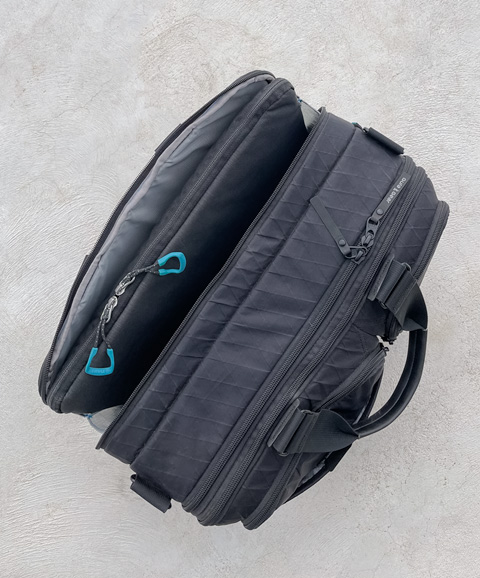
The Chobe 2.0 comes in two sizes: a 13″ and a 16″. I use a 15″ MacBook Pro, so I use the 16″ Chobe. When the 2.0 arrived, I was pleased to see that it still had all the things that made 1.0 so great. At first sight, they look identical, but upon closer inspection, I noticed some subtle improvements.
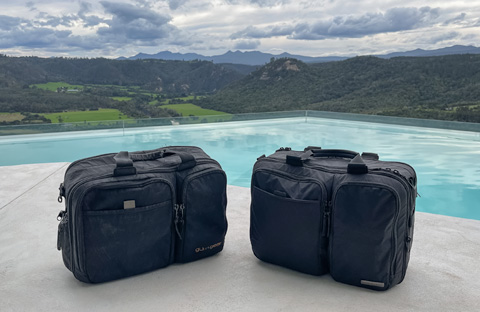
Chobe 1.0 left, Chobe 2.0 right — virtually identical
Chobe 2.0
On KLM flights, you are allowed 1 item of hand baggage, max. 21.5 x 13.5 x 10 inches (55 x 35 x 25 cm), and 1 accessory, max. 16 x 12 x 6 inches (40 x 30 x 15 cm). Both the Kiboko backpack and the Chobe bag fall within these maximum sizes.
The Chobe 2.0 has the same size as V1.0: 15.7 x 6.5 x 10.6 inches (39 x 14 x 24 cm). This usually gives me enough space for all the items that I can’t fit in my camera bag.
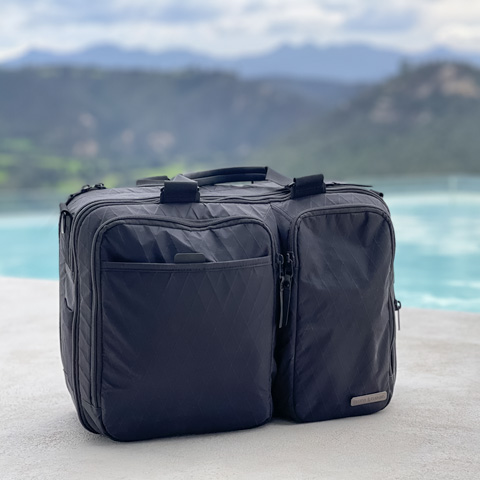
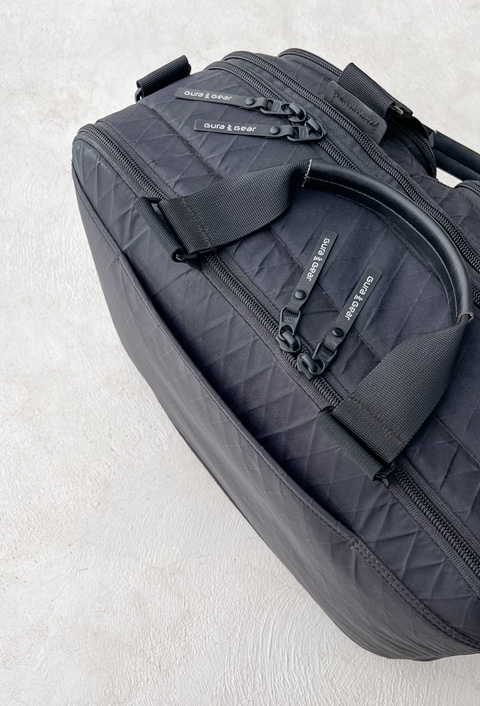
The Gura Gear Chobe 2.0
On the front of the bag are two large pockets, one bigger than the other. Both open and close with smooth pulling YKK zippers, the best zippers on the market. The large pocket also has a quick access pocket on the outside that closes with a bit of velcro. This is great to quickly get travel documents in and out while at the airport. I use the large pocket for my passport, vaccination booklet, business cards, 2 Nikon battery chargers (one for the large batteries, and one for the small ones), some SDD drives, and usually a pair of blinds, earplugs, and my earphones.
Here’s a clip that shows some of the larger items that I usually put in this pocket:
Inside this pocket are several smaller pockets; some open, and some with a (protected) zipper (one more than V1.0). I love those small pockets because it’s the perfect way to keep all the small items neatly organized. I could have put a lot more stuff in there, but you get the idea.
The right pocket is smaller and more rectangular. This is usually where I keep pens, flash drives, a flashlight, a USB hub, power cords for all chargers, home keys, lithium batteries charger (not for the camera), etc. Here’s a short clip:
On the opposite side is the laptop compartment. This offers plenty of room for my 15″ Macbook Pro, even inside its protective sleeve (which also contains my Wacom tablet, pen, and cable). What has changed in V2.0, is that this compartment can open much wider which makes for easier access. If you have a laptop that is larger than 15″ it will also fit in here. Also new is an open pocket inside that you can use for large documents or for an iPad.
The laptop compartment is large enough for my 15″ laptop inside its sleeve
I have also used this compartment without my protective pouch so that I can also fit Daniella’s laptop in there, as well as her iPad. This will obviously add significant weight to the bag, but in terms of space, it is no problem.
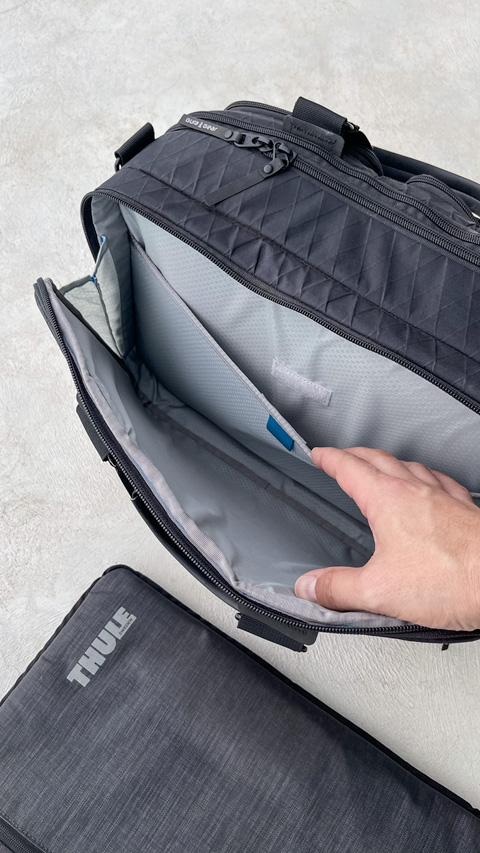
Extra pocket for large documents or an iPad
The main compartment is also the largest and the most important one — this is where you can put a lot of medium to large items that you would otherwise have to put inside your checked luggage or leave at home. What goes in here varies wildly depending on the destination and the kind of photography. Sometimes it only has a few extra items inside, sometimes it’s completely filled up to the zipper. There are two ways to fill this compartment: just chuck everything in there, or use one of the padded inserts with dividers. Most of the time I prefer the first option unless I have fragile items that need some extra protection. This clip shows what I had in there:
At the end of the clip, you can see that V2.0 has some extra padding on the bottom that is flexible — you can use it as a single or a double strip or move it out of the way. A nice improvement. There are five additional pockets in this compartment — 1 very large one that closes with velcro, two smaller ones that also close with velcro, and two smaller ones that close with a protected zipper.
I took a shot of all the medium and large items that I had in the Chobe:
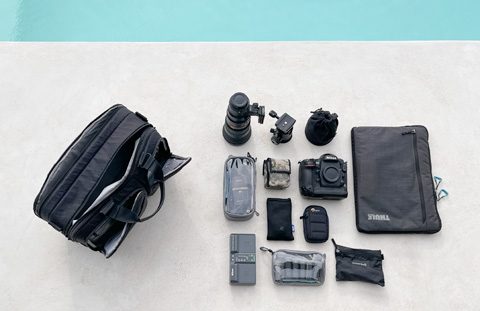
Example of medium and large items that can all fit inside
• Nikon 500/5.6 PF
• Full-size pro DSLR (Nikon D4s)
• Markins large ball head
• Nikon 20/1.8 in a protective pouch
• Gura Gear Et Cetera case (1L) for card readers and cables
• LensCoat battery pouch for two large Nikon batteries
• Nikon Charger for large batteries
• Charger for small Nikon batteries
• Gura Gear Et Cetera case for D850/Z7 batteries
• Pouch for power cords
• Pouch for small SSD drives
• Apple Macbook Pro in a protective pouch, including Wacom tablet
• A large variety of smaller items (still in the bag)
For most trips, this is enough extra space to get all my camera gear into the cabin. But sometimes I need more. Add a second flash, remote control, flashlights, a second ball head, a gimbal head, or a drone, and this will not be enough space. Luckily, the Chobe is not like most bags — it is expandable. If you need even more space to fit larger items, you can make it bigger! I love this feature, and I use it often. Here’s how that works:
When expanded, the Chobe offers 5 additional liters of capacity. When I do that, I can easily fit my Mavic Pro drone, the smart controller, and five batteries in there, as well as many of the above items. For maximum space, I use the Chobe without the padded insert. With the insert, you can fit less in, but still a lot. In this next clip, you can see what I managed to fit in the expanded Chobe with the insert inside:
Among the largest items are the Nikon D4s, the Z7 with the 24-70/4.0 S lens attached, a large flash, ball head, Nikon 20/1.8, two sets of filters, LaCie RAID drive, LaCie CoPilot, SSD drives, charger, batteries — al in one padded compartment.
If you are planning to use the Chobe as an overfill for traveling, and you’re not carrying very fragile items in it, I recommend using it without the padded insert for maximum internal space. This is how I use it most of the time. If, however, you want to use the Chobe as a casual reporter-style camera bag filled with cameras and lenses, then the padded insert with dividers is the way to go. In that case, you will also use the included padded shoulder strap.
That brings me to another highlight of this bag: its weight. The Chobe weighs only 2.1 lb (1 kg)! I cannot overstate the importance of this. Most comparable bags are significantly heavier, meaning that you will reach your maximum weight limit much quicker. And less weight, also means less weight to carry around. We are already unfortunate that all our gear is always so heavy, so it’s nice to have at least something important that is super lightweight.
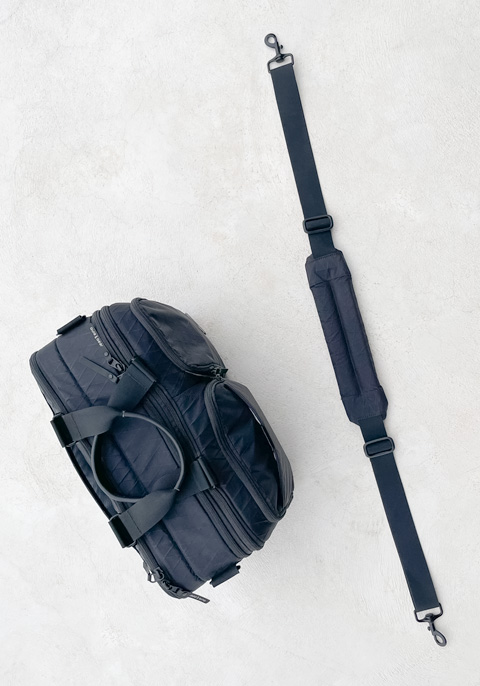
The should strap that comes with the Chobe
I personally don’t like straps very much, or I should say: my shoulders don’t like them. Also, when I am wearing my Kiboko backpack, there are already straps around my shoulders and there is no space for another one. For many years whenever I was traveling to and inside airports, I would simply carry the Chobe by the handles. That works fine when the bag is not full of heavy camera gear or when you don’t have to walk half a marathon at the airport, but with a few lenses and bodies in there it can get uncomfortable. Several years ago, I decided to do it differently: I got myself a little luggage cart — a cheap one that I bought at the airport.
This slit is where the handlebar of the luggage cart goes through
The Chobe has a sleeve on the back that you can use to slide the handlebar of a luggage cart through (see image above). In V1.0 this sleeve had a zipper at the bottom so you could close it, but in V2.0 that zipper is gone. I don’t miss it, because I use this part for its intended purpose: to attach the bag to a cart.
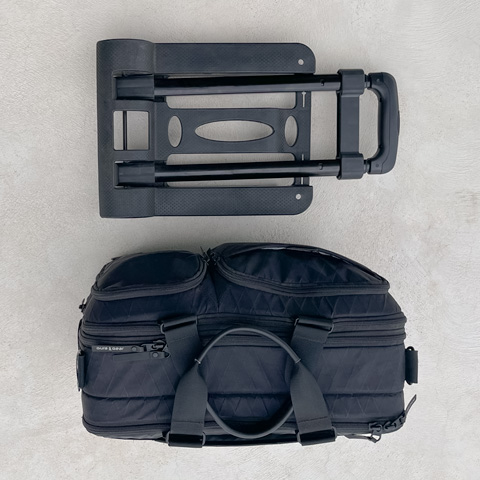
The Chobe and my cheap, lightweight, foldable luggage cart
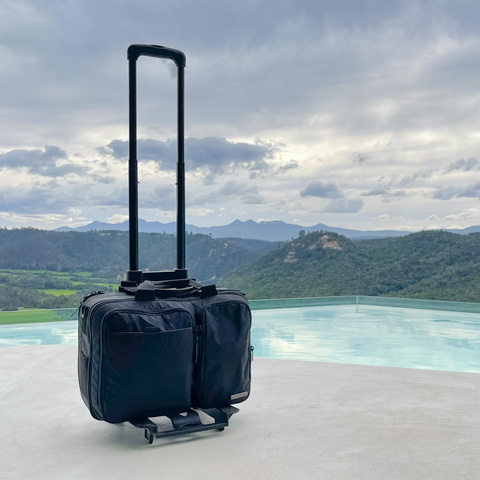
The Chobe converted into a roll-on
So there you have it: my cabin luggage strategy. The Kiboko on my back, and the Chobe on a little cart. Both bags are extremely lightweight and virtually indestructible. While this setup has been perfect for me for many years, the biggest challenge still remains — overall weight. My Kiboko on average weighs 17 kg, my Chobe weighs around 12 kg most of the time. This is way over the maximum weight limit for cabin luggage. So far, I have only had problems at the check-in counter three or four times. I those cases my tactics are always the same — I explain what is inside the bags, I mention what the approximate value is of the items inside the bags, and I explain that I simply cannot have these bags checked in as the airline will not take any responsibility for it. In all but one case, they allowed me to bring the bags into the cabin. Special tip: whatever happens: smile, be polite, and kindly ask for their understanding.
Conclusion
Although there are some small differences between V1.0 and V2.0, they are minor improvements. Chobe 1.0 has been my preferred camera bag in disguise for almost 10 years, and I am pleased that V2.0 is simply an improved version. Most laptop bags are stiff, overly padded, and heavy. Both the Kiboko and the Chobe use a different philosophy: flexible bags with less padding to create super lightweight bags with more space than other bags. This has always made so much sense to me — I am either carrying the Kiboko on my back or the Chobe in my hands, so I don’t need a stiff bag with an excessive amount of padding. Both these bags are classics and for a good reason: they are practical, reliable, and durable. And don’t forget: you can also use the Chobe as a regular laptop bag for the office or as a day bag for a short trip.
Is there anything that I dislike? Not really. There used to be a zipped pouch on the side of the Chobe that, when unzipped, you could use for a water bottle. That pouch is now gone, and I think that’s a shame. That’s it, really. I totally recommend this bag.
I am fortunate that Gura Gear is one of my sponsors. Some people seem to think that it is impossible to write an objective review of one of the products from your sponsor. They are wrong. I am a professional photographer and I work only with the best gear there is. The best cameras, the best lenses, the best computers, the best software, the best monitors, the best RAID systems, and the best bags. To not do this would be foolish. I am often approached by potential sponsors, and almost always I tell them: no, thank you. I don’t want to work with stuff that I get for free, I want to work with the best there is. This is why many of my reviews of the products I use tend to be rather positive — I have picked them for a reason. Finding the right products in a time when there is too much to choose from can be difficult and time-consuming. By sharing my personal experience with the products I use I hope I can help you to choose the right one for you easier and faster.
If you have any questions regarding this review or my camera bags, let me know in the comments below and I’ll get back to you.
Marsel
I need help getting them to ship my bag before June 4th!!! I used your name as who advised me to get the bag. I ordered in March.
Happy to hear you got it in time!
I signed up for the Chobe 2.0 super starter kit and cannot find out what is included in that kit any more. Would be nice to speak to a live person! Am concerned now because Gura Gear does not seem eco know what I am talking about. Total confusion!
Hi Frank — to be honest, I also don’t know anything about the starter kit you mentioned. I know the bag was offered at a reduced price when it was introduced last year, but that was only a temporary thing.
THANKS Marsel….. this is super enlightening…. and very helpful. Being a “bag ho” like many photographers, I am always searching and looking to better my gear. Successfully traveled with my Mindshift bag which I liked quite a lot due to it being light as well, but the handle broke and in spite of my jury rigging it, it is not that functional. Like you, not a fan of straps on any of my luggage. I think I will try this Chobe !
Hi Paul — good to hear you found this helpful. I have been using my V1.0 for almost 10 years on all my tours, which is a clear indication that I really love this bag.
Hey Maresel, thanks for the reco, the bags both look great. When you use the Kiboko and travel with your 400 or 180-400, are you able to pack it with the tripod foot attached?
You’re welcome, Brent. As for your question: yes. And even better: I always put my 180-400 in the Kiboko with a body attached, usually the D850. I should add that I always replace the standard lens foot with an Arca-Swiss style low profile lens foot — those take up much less space and then I don’t need a lens plate anymore. Hope that helps.
Marsel
What is the brand and model of luggage cart you are using
https://go.travel/us/travel-trolley
Dear Marsel,
Thanks for the extensive review. Now I am looking to buy the Kiboko somewhere in the Netherlands, do you have any who their dealers are, I can’t find it on their site either.